Stock Photos

Thursday 24 December 2009

10 Reasons to Turn off Your Autofocus

A Guest Post by Alistair Scott.

When I started using a camera autofocus was something out of science fiction. I mean … it would never work in real life, would it? Apart from anything else, how could it know what you wanted to focus on?
turn-off-auto-focus-01.jpg

Now fiction has become fact, and pretty well every camera has AF as standard. It works, and works well. But it doesn’t always work perfectly. It can pick up the wrong thing or fail to find anything to focus on, causing the lens to ‘hunt’ back and forth. Sometimes it won’t even let you fire the shutter.

So, here are ten situations when it’s worth turning your autofocus off and going back to the ‘good old days’ of manual focusing:

1. When there’s not enough light

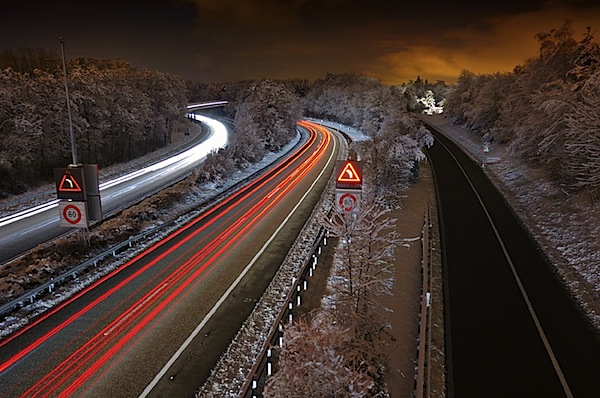
In low light, contrast is also low, and AF relies on light and contrast to latch on to things. Your camera may have an AF assist lamp built in. But, even if you have it switched on, it won’t work in situations like in the shot above.

Though the image looks bright enough, in reality there was little light, and it required a 30-second exposure.

2. When there’s not enough contrast

If your AF metering spot is on something like a plain-coloured wall the camera will find it impossible to focus, no matter how bright the light, and the lens will ‘hunt’. You can re-frame your shot temporarily so the spot is on something with detail and press the shutter half down to activate the AF. Then keep the shutter button half-pressed to lock the focus, and go back to your original composition. Or focus by hand.

3. Shooting wildlife

Most wild animals have excellent hearing and, no matter how good your autofocus, it will make a noise. Even the slightest whirr is likely to spook wildlife. Switch it off if you want those great, natural wildlife shots.

4. With landscapes

When shooting landscapes you usually want things in focus from the foreground to distant mountains. This means closing down the aperture to increase depth of field and focusing about a third of the way into the scene (at a point called the ‘hyperfocal distance’ where everything from quite close to infinity is sharp). Switch off the AF. If you leave it on, when you press the shutter it will re-focus … probably on those far-off mountains.

5. If you’re doing HDR

High Dynamic Range photography involves taking several shots of the same scene, all exactly the same except for exposure, then blending them when you’re back at the computer. It’s important to have identical focus in each shot to ensure success. With AF on, it may choose a slightly different focus point for each shot.

6. Fast action

When you’re photographing a fast-moving subject, your AF will have its work cut out to keep up with the changing distances. Most times it fails. At this jump, in a radio-controlled buggy competition, I first started shooting in burst mode, with the AF switched on. This was the sort of thing I kept getting.

turn-off-auto-focus-02.jpg

turn-off-auto-focus-03.jpg

turn-off-auto-focus-04.jpg

It wasn’t until I switched the AF (and burst mode) off and pre-focused on a spot where most of the buggies landed that I started to get decent shots.

turn-off-auto-focus-05.jpg

7. Shooting through glass

Taking photographs through glass is generally not a good idea. Avoid it if you can. But sometimes it’s unavoidable, e.g. if you’re in a plane, or photographing fish in an aquarium. The trouble is, the AF may home in on reflections, or marks on the glass. So switch it off.

8. With portraits

The golden rule of portraiture is to focus on your subject’s eyes. What’s more, you often use a wide aperture to throw the background out of focus. But if your autofocus picks up your subject’s eyebrows or the tip of the nose then, because you’ve got such a narrow depth of field, the eyes will be blurred.

9. Macro

With macro photography autofocus has a hard time. The depth of field is so tiny that the camera has no idea what you want to focus on and the lens is likely to hunt wildly. You definitely must take control.

10. Composition with the ‘Rule of Thirds’

Many cameras have the autofocus spot fixed in the middle of the viewfinder. This means that if you’re composing with your subject at one of the classical ‘thirds’ positions it is likely to be out of focus.

turn-off-auto-focus-06.jpg

In this image a centralised autofocus would not pick up the boat and, on top of that, it would have difficulty latching to the smooth water of the lake.

So … autofocus is brilliant but it’s not infallible. A good photographer knows when to take control of the camera to get great shots in challenging situations

Alistair Scott is an award-winning freelance photographer and writer who has travelled the world widely. He lived for 20 years in Africa, but is now based in Switzerland. His latest book is ‘The LowDown Guide to Family Photography’, which can be seen at www.alscotts.com/fampage

Wednesday 23 December 2009

Don't Make These Mistakes With Your Camera!

With digital cameras at their most affordable, anybody can be a photographer these days. Problem is, it takes more than a camera to take good pictures.

It takes a certain eye, a way of seeing things, to take pictures that make people go "Wow!". Fortunately, it can be learned. And the more you practice, the better you'll get.


If you're interested in becoming a good digital photographer, I recommend the "Shoot Digital Pics Like the Pros," a free report.

Start by taking a look at these most common mistakes people make when taking digital pictures:

1. Not knowing your camera

If you never read your digital camera's manual and learn its features and how to use them, you won't be able to make the most of it.

2. Not using a tripod

Tripods allow you to take the sharpest pictures even in low light. Use one as often as possible.

3. Not giving the camera time to focus

Digital cameras need time to properly focus and get the right exposure. It can take a fraction of a second or a couple of seconds. Account for this when taking pictures.

4. Relying too much on zoom

Using the camera's zoom feature makes the picture grainier. Get as close to the subject as possible.

5. Taking pictures against the light

This makes the subject dark and the background too bright.

6. Relying too much on the flash

Natural light gives the best pictures, so use it as much as possible. Flash tends to make images look harsh.

7. Not taking enough pictures

It's almost impossible to take the perfect shot at one try, so take many pictures. With digital photography, this doesn't cost you extra. Try different angles and compositions.

8. Always putting the subject dead center

Learn the rule of thirds in composition, and you'll have more interesting pictures.

9. Forgetting to check the horizon

When taking pictures with the horizon showing, make sure it's level.

10. Selecting a low-resolution setting

Your camera will allow you to select different resolutions. Don't be tempted to choose a low resolution just to save on memory space. Instead, buy additional memory for your camera and always take your pictures in high resolution.

11. Trying to take too much

Don't try to include too many things in one picture, such as people and scenery. A picture is more effective when it's focused on a single subject.

12. Not using the camera

You'll never know when a good photo op will come up, so have your camera with you at all times.

It may seem like a lot to think about, but with practice, these things will become second nature.

For those who want to learn even more digital photography techniques, check out the free report, "Shoot Digital Pics Like the Pros." It's a short but info-filled guide that will have you shooting digital pictures like a pro in no time.

Find out more about "Shoot Digital Pics Like the Pros" here:
www.learndigitalphotographynow.com

Tuesday 22 December 2009

EVERY PHOTOGRAPHER SHOULD HAVE A WEB SITE


Now you can set up your own web site with UNLIMITED
disk storage capacity, which you will need for photos,
for just $4.95 monthly. This package is IDEAL for
freelance photographers to showcase their work.

Click here.

Monday 21 December 2009

Christmas is ideal for digital photography

As the song says, "Christmas is the best time of the year." This is the time when families come over to eat a nice dinner together and feel that love and giving in the air. With a moment like this, it is right to capture this moment through digital photography and here are the steps to capture that memory right.


1. Prepare a list: In Christmas photography, it is important for you to have your digital camera ready. However, remember that the most frustrating thing that may happen in photography is when your camera ran out of disk space or batter so make sure you have fully charged the battery or have spare ones and sufficient space in your memory card.

2. Set up a portrait zone of your own: Find a good back drop or create yourself one where you can get nice pictures of everyone.

3. Capture the preparation stage: Want to be artistic? Capture your family members right on the act of preparing the food, wrapping gifts, and when they put décor on the area. And with the perfect angle, you will have flowing and expressive stills with their movements.

4. Find point of interest but just per shot: Set your camera to focus on just one item in photography. This will give you a very artistic shot suited for the occasion. Remember, less focal point is more in photography.

5. Arrange all family members for a group photo: Nothing will beat the memory of family members getting together for Christmas. Arrange the family members on right positions to get the best shot that will remind you of this Christmas season.

6. Make sure that Christmas photos fill your frame: Do not waste too much frame space. You will make a better focal point by zooming in to your subject with the appropriate angle and lighting.

7. Go close when taking pictures: This is connected with the sixth tip. Most of the time, zooming in may not give the best angle and shot so it is better to go closer to your object to fill the whole frame space.

8. Take the pictures without the flash turned on: Most of the time, flash distorts the expression of the photography. So better take pictures without flash even at night and let the Christmas light elucidate a natural feel on your photography.

By doing these steps, you will have pictures as if taken by a professional photographer, suited for a special occasion of the year.

Palin is the author of Onewashopping.com. If you would like more information about Price Comparison Services, please visit http://onewayshopping.com.

Article Source: http://EzineArticles.com/?expert=Palin_Mergrego


Reader's Digest Complete Photography Manual: A Practical Guide to Improving Your Photography

500 DIGITAL PHOTOGRAPHY HINTS, TIPS; The Easy, All-In-One Guide to those Inside Secrets for Better Digital Photography

Thursday 17 December 2009

Why Don't I Look Good In Pictures?

Some people don't – and for very real reasons...

I've been taking professional photographs for about thirty years. Ever since I started, I've heard a constant comment. It is always said something like "I just don't take good pictures" or "the camera just doesn't like me." Almost invariably, when this statement is uttered, everyone within earshot gives a chuckle, or immediately starts assuring the speaker that they really do look good. Sometimes it's true, but often it's not...

Some people do not photograph well – it's that simple.

To the best of my knowledge, nobody has ever been able to compose a list of physical features that cause someone to photograph well, or photograph poorly. Game show guru Monty Hall believed that the secret was in the size of the head. He insisted that all of the hosts of his shows had large heads. Obviously, this worked for him – his unmatched success attests to that.

Hollywood stars and starlets are very persnickety about how they are photographed. There are extreme cases, such as actor Alan Ladd. Mr. Ladd was quite short, and insisted that trenches be dug throughout the sets to make him always appear taller. When a trench wouldn't do, he had stools. Barbra Streisand goes to great lengths to ensure that only one of her profiles is photographed. Note that she will always have her escort on her right arm – to cause photographers to shoot her from the left side – her best side, according to the singing actress.

If you've looked at enough photographs, and seen enough TV and movies, you've been struck by one or two anomalies. Someone who is frightfully unattractive looks great in a photograph, or, someone who is stunningly attractive looks horrible. What causes this? Is the photographer lacking skill? Bad lighting, perhaps? Did the subject have a bad day? Of course these things could be true, but there's actually a very real, constant explanation for this phenomenon: dimensions.

We humans live in a world of three dimensions: front/back • left/right • up/down. Since we have stereo vision, we can see all three of these dimensions. Using geometry, we can see how the dimensions are arrived at. A straight line is one dimension: front back. To create the second dimension, make a line at a right angle to the first line, and do so until you have a square. This is two dimensional. Now, make squares at right angles to the first square until you have a cube – that's three dimensional. Voila!

We suspicion that there are more dimensions. Using the first three dimensions as the guide, if you took a cube and made cubes at right angles to it, ultimately you'd have a 4-D cube – sometimes called a hypercube, or "tesseract." The problem is, we can't even imagine a tesseract, much less make one. It's all theoretical. Some things in geometry are hard to grasp, but a tesseract is impossible to grasp.

One of the problems we have in understanding geometry is simply this: a two dimensional object, such as a square, has absolutely NO depth (thickness) at all. This means that it is completely invisible when looked at from the side view. But what's this all got to do with why you don't look good in photographs? Simple: people are three dimensional, and photographs are only two dimensional.

Anytime that you lose a dimension, your view is penalized, per se. If I take a head-on photograph of a cube, it appears as a square. I can do some 'tricks' to fool the viewer, such as make sure there is a shadow showing that the square is actually a cube, or taking the photo at an angle which shows at least one other side of the cube. But no matter what I do, the picture will always be a two dimensional view of a three dimensional object. Needless to say, there is a substantial difference between a square and a cube. And there is a substantial difference between seeing someone and seeing a picture of that same someone.

In people, all sorts of things affect how we perceive them. Many of these things are only present because of the third dimension. The distance between the ears and the tip of the nose, the depth of the eye sockets, the distance the nose and chin protrude from the face, and so on. None of these elements of a person's appearance are necessarily discernable in a photograph, and yet they are easily seen in person.

Some people are attractive because of the 3-D elements. Others do not depend on 3-D elements so much for their attractive appearance. And some people have such a string feature that is visible in 2-D, that any loss of 3-D is not very noticeable. Paul Newman, for example, was quite famous for his striking blue eyes. Blue is not dependant on dimension. Try to find a professional photograph of comedian/actor Jimmy Durante that did not emphasize his notoriously prominent proboscis. In a frontal view, he was just a mediocre looking fellow, but when his face was photographed to accentuate his large nose, he became quite unique.

If you or someone you know doesn't photograph well, take heart. You might try getting a digital camera and shooting picture after picture – each one showing just a modest shift of the angle of the head. Don't just change the angle side-to-side, but up and down as well. Looking slightly upward changes everything, as does looking slightly to one side. Do this in full, but not direct light – such as under your porch, or on a cloudy day. Don’t use the flash! If this doesn't achieve the desired result, try the same thing, but have a prominent light source. You can do this by pointing a light directly towards yourself, or by sitting in a darkened room, with only one light source in the room.

The techniques above will help to exaggerate the illusion of 3-D in the 2-D medium of the photograph. Do this enough, in enough positions and with enough lighting changes, and you just might be able to get back those good looks the camera's 2-D limitation has stolen from you. All the best!

www.edityourdigitalphotos.com


Friday 11 December 2009

How To Fix Underexposed Photos

Here’s a great video video tutorial, which shows you how to fix underexposed photos - incredibly useful to know.

(Remember this is a lower quality “YouTube” version of one of the video tutorials taken from the full edityourdigitalphotos.com set, the full set are much higher quality of course.)

If you feel like it, you can leave your opinion on this video in the “comments” section bvelow, I’d love to hear from you.

Just click the play button to watch…


For a free guide with many more tips got to www.edityourdigitalphotos.com

Wednesday 9 December 2009

Video Review of "Photoshop Fast Track for Digital Photographers

Seller: www.edityourdigitalphotos.com


Summary:

"Photoshop Fast Track for Digital Photographers" is a collection of 22 videos, which demonstrate how to edit digital photos using Photoshop. Each video is a step-by-step tutorial of the most common image editing tasks in Photoshop.

Product Details:

The main product is a set of 34 instructional videos. These include 12 video tutorials for Photoshop, from Photoshop 7 through to the later versions bundled with Creative Suite products (CS2 and CS3). Most of the videos are less than 5 minutes long. The longest video is 12 minutes and 48 seconds.

The topics for Photoshop 7 through CS2 are:

- Change Eye Color
- Change Hair Color
- Fix Underexposed Photos
- More Punch Photo
- Instant Tan
- Panoramic
- Double Chin
- Remove Red Eye
- Remove Spots and Blemishes
- Remove Unwanted Objects
- Remove Wrinkles
- Whiten Teeth

The topics for CS3 are:

- Batch Rename
- Batch Resize
- Change Hair Color
- Double Chin
- Eye Color
- Instant Tan
- Look Funny
- Look Slimmer
- More Punch Photo
- Photomontage
- Red Eye Removal
- Remove Spots and Blemishes
- Remove Unwanted Objects
- Remove Wrinkles
- Replace Backgrounds
- Selective Color
- Smooth Skin
- Soft Romantic
- Straighten Image
- Fix Underexposed Photos
- Whiten Teeth

"Photoshop Fast Track for Digital Photographers" also includes the following bonuses:

- Video tutorial images: These are the exact same images edited in the videos. The customer can work on the same images and practice the skills each video demonstrates.

- Flickr tutorials: A step-by-step guide on how digital photographers can make the most of this free site to share (and show off) your photos. There are 14 videos on Flickr alone.

Format: Online video in both Flash and Shockwave formats, which can be viewed online and downloaded into the user’s hard drive The tutorial images are digital image files (JPG).

The Flickr tutorial is in online video format as well.

Thoughts on the Product:

Whether you edit digital photos for fun or for work, these video tutorials will make the tasks much easier.

Photoshop is a powerful graphic editor, but the learning curve can be pretty steep. You could spend hours learning everything yourself, or pay for a class. Or, you could watch these videos and learn the most common digital photo editing tasks at your own pace.

Video demonstration is an excellent way of learning a complicated software such as Photoshop. It’s like looking over the shoulder of an instructor - but one that you can pause, rewind or fast forward as needed.

The best way to use these videos is to have Photoshop open in another window, pause the video to complete each of the steps demonstrated, and then compare your final result with that of the video. Because the tutorial images are included, this is easy for users to do. You get instant feedback and practice.

The tutorials are for different versions of Photoshop, from Photoshop 7 to CS3.

Where to Learn More: www.edityourdigitalphotos.com


Monday 7 December 2009

Photo subjects that sell


What sort of material is selling best on stock photo sites?

There's no real standout answer to this question - every sale seeems to be totally different to the last!

There are some regulars though....

Anything with people in it! These aren't necessarily "portrait" pics - they are more likely to be classed as "lifestyle" images.

People doing things - so it doesn't matter how you currently classify your work, if you can start including a few people you are probably going to improve your sales ability!

Other regular subjects are nature, wildlife, industry, technology, sports and communication, but even these are only part of the picture.

Perhaps the person who can best answer this question is you!

Only you really know the type of work you do; the subjects and styles etc, so you need to do some market research yourself and look for situations where your images could have been used.

Get in the habit of studying the images you see around you every day ... books, magazines, websites, billboards, packaging, junk mail! ... they are all commercial images and they are all selling. Pay particular attention to those subjects that overlap with your current work.

The trick is to then apply what you learn to your own work ... look for the elements within the images that make them work; think about why the buyer would have selected that image, and how you could improve on it.

This is regardless of which stock photo site you choose to sell your work through.

Make this a habit and you'll not only get a better idea of what's currently selling, your own work will become more saleable in the process!


Discover Further Photography Techniques By Reading This Free Digital Photography Report – www.LearnDigitalPhotographyNow.com

Thursday 3 December 2009

Top 10 Digital Photo Quick-Fixes

Digital photography has made taking professional-looking photos within the reach of even the rank beginner. Aside from the ease of use and rich features digital cameras themselves offer, we're able to edit our digital photos easily.

Turning an image from ok to extraordinary is only a few clicks away, thanks to digital image editing software like Adobe Photoshop. If you're interested in mastering the top software for editing photos, click the image (or link below) to find out how you can learn Photoshop in 2 hours or less www.edityourdigitalphotos.com.

Here are 10 digital photo quick fixes you can make to make your digital pictures stand out.

1. Remove red eye

Red eyes make your pictures look amateurish. Why put up with it when it's so easy to fix? Take the time to remove red eye from portraits.

2. Sharpen blurred images

Sometimes you've captured the perfect moment, but your hand shook or the subject was moving too fast, or the scene didn't have enough light. The result is a blurry or out-of-focus picture. It's still possible to salvage blurred pictures using image editing software like Photoshop.

3. Fix the exposure

Another quick fix is making sure an image has the right exposure. That is, it's neither too light nor too dark. Adobe Photoshop and other image editing software makes fixing exposure super easy.

4. Crop the image

The simple act of cropping an image can improve it significantly. Crop an image to achieve better composition and remove unwanted elements from the background.

5. Remove spots and blemishes

A blemish can mar an otherwise beautiful smile on a portrait. All it takes is a few clicks to give your subject a perfect complexion.

6. Remove unwanted objects

Sometimes a picture would be perfect... if only that flagpole didn't look like it was growing out of your subject's head! Take out distracting elements from your digital images.

7. Smoothen skin

Use Photoshop's Healing Brush tool to minimize wrinkles and give your subject a more youthful appearance. Edit Your Digital Photos gives a step-by-step video tutorial of how to use it and still get natural, believable results.

8. Straighten the image

A common mistake in digital photos is to have a crooked photograph. This is obvious when a photo includes the horizon - make sure it's level. If it isn't, then edit the image to straighten it.

9. Whiten teeth

This is another way to make your portraits stand out. It's easy to whiten your subject's teeth with Photoshop's Dodge tool - but don't overdo it. Keep it realistic.

10. Correct colors

Is the picture too orangey? Or too green? Or would it look better if it were cooler or warmer? You can easily adjust color levels to achieve the effect you want.

Next time you're about to share or display your pictures, go through this list of quick fixes first. Each one takes only a few minutes to do, but you'll have much better pictures.

Want step-by-step tutorials on using Adobe Photoshop to edit your digital pictures? Find out how you can get your own personal Photoshop tutor. Go to www.edityourdigitalphotos.com

Wednesday 2 December 2009

Basic Photography – How To Add Special Effects To Photos With Adobe Photoshop And Basic Photography Tutorials


StopIn an effort to create a lasting impact from your photo, leaving the impressions on viewer’s minds, it should have something that keeps him glued. You can employ Adobe PhotoShop’s special effects tools in the menu to add a lightning effect. You can double your exposures or do whatever you choose. The advantage of owning Adobe Photoshop is the rewards it will bring. In fact, I used this program to design my book covers, make commercials, advertising slicks and more, so sit back and enjoy this basic photography course.

Lightning Effect: You can use various types of lightning effects and of different colors, applying them to an image using Adobe Photoshop. This will enhance your basic photography skills tremendously. Note that these tips are perfect for newbies as everything is explained in basic photography terms.


How to do it:-

We’ll follow a stepwise manner in doing this:

1. Open your editor or Adobe Photoshop program

2. Now open the desired image (make sure you open it in RGB format)

3. Now from the filter menu choose Renderer and then select your desired lighting effects.

4. You will see the lighting effect dialogue box opens up.

Then..

1. Choose the desired lighting style from the topmost selection menu; you will notice the options style of lights.

2. Choose the light type and move the sliders to set the intensity and focus.

3. You can also change the properties by toggling the sliders for glass, material, exposure, and ambiance.

4. You can also change the color of light. To change the color of light just click on the boxes to the right of the light type and properties. This will open the color, picker dialogue box. Choose a color and press ok.

5. To change the direction or placement of light just drag any of the points on the outside ellipse or center point. Click ok after you have adjusted the direction and placement of light. How about that for a basic photography lesson!

Creating Double Exposure effect is one of the best basic photography tips: A double exposure image is created by overlaying two images on one another.

Like above we’ll again follow a stepwise procedure:

1. Select all or a part of the image using the selection tools at the top of the toolbar.

2. Now from the edit menu choose copy.

3. Now open a second image file.

4. From the window menu, you can select the show layer.

5. On the ‘show layer’ popup right click and choose new layer and press ok.

6. Now go to the edit menu and press paste.

7. From the layer’s palette, move the opacity slider to 50%.

8. Now drag the mouse from inside the selection to move it.

9. To scale the pasted selection, click on image menu and then select image size. Adjust the size by adjusting the pixels and height from the pop-up window.

The editing programs today can do wonders to images. One of the most popular programs is Adobe PhotoShop, since this editing program is one of the most sophisticated tools. Most pro photographers will use this program, since you can create web sites, book covers, images, movies, and more. Adobe is also used to design manuals, graphics, commercials, fliers, and more. This particular program I miss. I lost my copy during a severe virus attack, and the downside is it costs around $1000 to $1500 to replace.

Outside of lightning effects, you can also setup brick backgrounds, or whatever background you choose. If you own this program you know what I am talking about, however if you have never had the experience and can get the opportunity to try out Adobe I promise you will have loads of fun. For additional editing assistance check out your menus, Help tools.

Discover Further Basic Photography Techniques By Reading This Free Digital Photography Report – www.LearnDigitalPhotographyNow.com