Stock Photos

Thursday 24 December 2009

10 Reasons to Turn off Your Autofocus

A Guest Post by Alistair Scott.

When I started using a camera autofocus was something out of science fiction. I mean … it would never work in real life, would it? Apart from anything else, how could it know what you wanted to focus on?

turn-off-auto-focus-01.jpg

Now fiction has become fact, and pretty well every camera has AF as standard. It works, and works well. But it doesn’t always work perfectly. It can pick up the wrong thing or fail to find anything to focus on, causing the lens to ‘hunt’ back and forth. Sometimes it won’t even let you fire the shutter.

So, here are ten situations when it’s worth turning your autofocus off and going back to the ‘good old days’ of manual focusing:

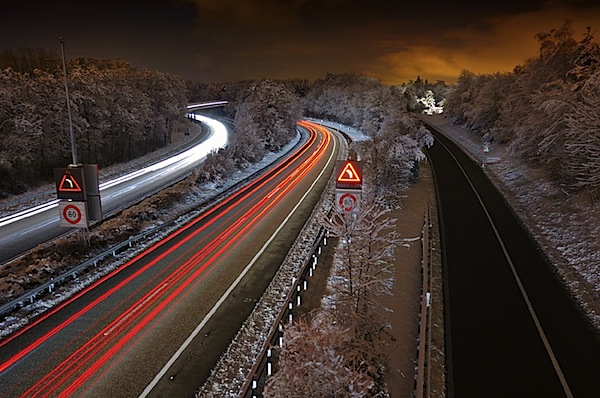
1. When there’s not enough light

In low light, contrast is also low, and AF relies on light and contrast to latch on to things. Your camera may have an AF assist lamp built in. But, even if you have it switched on, it won’t work in situations like in the shot above.

Though the image looks bright enough, in reality there was little light, and it required a 30-second exposure.

2. When there’s not enough contrast

If your AF metering spot is on something like a plain-coloured wall the camera will find it impossible to focus, no matter how bright the light, and the lens will ‘hunt’. You can re-frame your shot temporarily so the spot is on something with detail and press the shutter half down to activate the AF. Then keep the shutter button half-pressed to lock the focus, and go back to your original composition. Or focus by hand.

3. Shooting wildlife

Most wild animals have excellent hearing and, no matter how good your autofocus, it will make a noise. Even the slightest whirr is likely to spook wildlife. Switch it off if you want those great, natural wildlife shots.

4. With landscapes

When shooting landscapes you usually want things in focus from the foreground to distant mountains. This means closing down the aperture to increase depth of field and focusing about a third of the way into the scene (at a point called the ‘hyperfocal distance’ where everything from quite close to infinity is sharp). Switch off the AF. If you leave it on, when you press the shutter it will re-focus … probably on those far-off mountains.

5. If you’re doing HDR

High Dynamic Range photography involves taking several shots of the same scene, all exactly the same except for exposure, then blending them when you’re back at the computer. It’s important to have identical focus in each shot to ensure success. With AF on, it may choose a slightly different focus point for each shot.
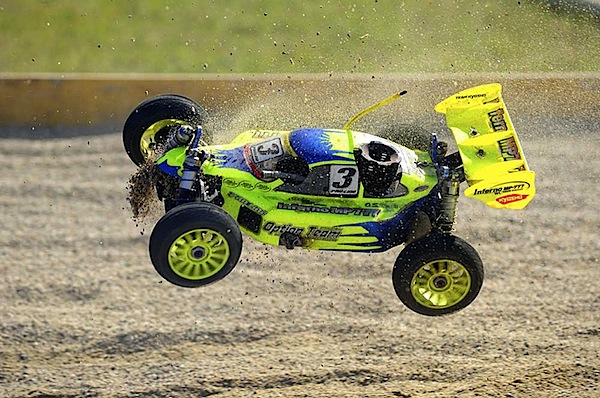
6. Fast action

When you’re photographing a fast-moving subject, your AF will have its work cut out to keep up with the changing distances. Most times it fails. At this jump, in a radio-controlled buggy competition, I first started shooting in burst mode, with the AF switched on. This was the sort of thing I kept getting.

turn-off-auto-focus-02.jpg

turn-off-auto-focus-03.jpg

turn-off-auto-focus-04.jpg

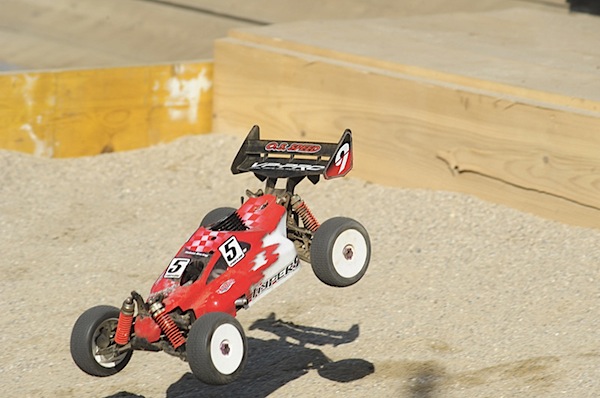
It wasn’t until I switched the AF (and burst mode) off and pre-focused on a spot where most of the buggies landed that I started to get decent shots.

turn-off-auto-focus-05.jpg

7. Shooting through glass

Taking photographs through glass is generally not a good idea. Avoid it if you can. But sometimes it’s unavoidable, e.g. if you’re in a plane, or photographing fish in an aquarium. The trouble is, the AF may home in on reflections, or marks on the glass. So switch it off.

8. With portraits

The golden rule of portraiture is to focus on your subject’s eyes. What’s more, you often use a wide aperture to throw the background out of focus. But if your autofocus picks up your subject’s eyebrows or the tip of the nose then, because you’ve got such a narrow depth of field, the eyes will be blurred.

9. Macro

With macro photography autofocus has a hard time. The depth of field is so tiny that the camera has no idea what you want to focus on and the lens is likely to hunt wildly. You definitely must take control.

10. Composition with the ‘Rule of Thirds’

Many cameras have the autofocus spot fixed in the middle of the viewfinder. This means that if you’re composing with your subject at one of the classical ‘thirds’ positions it is likely to be out of focus.

turn-off-auto-focus-06.jpg

In this image a centralised autofocus would not pick up the boat and, on top of that, it would have difficulty latching to the smooth water of the lake.

So … autofocus is brilliant but it’s not infallible. A good photographer knows when to take control of the camera to get great shots in challenging situations

Alistair Scott is an award-winning freelance photographer and writer who has travelled the world widely. He lived for 20 years in Africa, but is now based in Switzerland. His latest book is ‘The LowDown Guide to Family Photography’, which can be seen at www.alscotts.com/fampage

Wednesday 23 December 2009

Don't Make These Mistakes With Your Camera!

With digital cameras at their most affordable, anybody can be a photographer these days. Problem is, it takes more than a camera to take good pictures.

It takes a certain eye, a way of seeing things, to take pictures that make people go "Wow!". Fortunately, it can be learned. And the more you practice, the better you'll get.


If you're interested in becoming a good digital photographer, I recommend the "Shoot Digital Pics Like the Pros," a free report.

Start by taking a look at these most common mistakes people make when taking digital pictures:

1. Not knowing your camera

If you never read your digital camera's manual and learn its features and how to use them, you won't be able to make the most of it.

2. Not using a tripod

Tripods allow you to take the sharpest pictures even in low light. Use one as often as possible.

3. Not giving the camera time to focus

Digital cameras need time to properly focus and get the right exposure. It can take a fraction of a second or a couple of seconds. Account for this when taking pictures.

4. Relying too much on zoom

Using the camera's zoom feature makes the picture grainier. Get as close to the subject as possible.

5. Taking pictures against the light

This makes the subject dark and the background too bright.

6. Relying too much on the flash

Natural light gives the best pictures, so use it as much as possible. Flash tends to make images look harsh.

7. Not taking enough pictures

It's almost impossible to take the perfect shot at one try, so take many pictures. With digital photography, this doesn't cost you extra. Try different angles and compositions.

8. Always putting the subject dead center

Learn the rule of thirds in composition, and you'll have more interesting pictures.

9. Forgetting to check the horizon

When taking pictures with the horizon showing, make sure it's level.

10. Selecting a low-resolution setting

Your camera will allow you to select different resolutions. Don't be tempted to choose a low resolution just to save on memory space. Instead, buy additional memory for your camera and always take your pictures in high resolution.

11. Trying to take too much

Don't try to include too many things in one picture, such as people and scenery. A picture is more effective when it's focused on a single subject.

12. Not using the camera

You'll never know when a good photo op will come up, so have your camera with you at all times.

It may seem like a lot to think about, but with practice, these things will become second nature.

For those who want to learn even more digital photography techniques, check out the free report, "Shoot Digital Pics Like the Pros." It's a short but info-filled guide that will have you shooting digital pictures like a pro in no time.

Find out more about "Shoot Digital Pics Like the Pros" here:
www.learndigitalphotographynow.com

Tuesday 22 December 2009

EVERY PHOTOGRAPHER SHOULD HAVE A WEB SITE


Now you can set up your own web site with UNLIMITED
disk storage capacity, which you will need for photos,
for just $4.95 monthly. This package is IDEAL for
freelance photographers to showcase their work.

Click here.

Monday 21 December 2009

Christmas is ideal for digital photography

As the song says, "Christmas is the best time of the year." This is the time when families come over to eat a nice dinner together and feel that love and giving in the air. With a moment like this, it is right to capture this moment through digital photography and here are the steps to capture that memory right.


1. Prepare a list: In Christmas photography, it is important for you to have your digital camera ready. However, remember that the most frustrating thing that may happen in photography is when your camera ran out of disk space or batter so make sure you have fully charged the battery or have spare ones and sufficient space in your memory card.

2. Set up a portrait zone of your own: Find a good back drop or create yourself one where you can get nice pictures of everyone.

3. Capture the preparation stage: Want to be artistic? Capture your family members right on the act of preparing the food, wrapping gifts, and when they put décor on the area. And with the perfect angle, you will have flowing and expressive stills with their movements.

4. Find point of interest but just per shot: Set your camera to focus on just one item in photography. This will give you a very artistic shot suited for the occasion. Remember, less focal point is more in photography.

5. Arrange all family members for a group photo: Nothing will beat the memory of family members getting together for Christmas. Arrange the family members on right positions to get the best shot that will remind you of this Christmas season.

6. Make sure that Christmas photos fill your frame: Do not waste too much frame space. You will make a better focal point by zooming in to your subject with the appropriate angle and lighting.

7. Go close when taking pictures: This is connected with the sixth tip. Most of the time, zooming in may not give the best angle and shot so it is better to go closer to your object to fill the whole frame space.

8. Take the pictures without the flash turned on: Most of the time, flash distorts the expression of the photography. So better take pictures without flash even at night and let the Christmas light elucidate a natural feel on your photography.

By doing these steps, you will have pictures as if taken by a professional photographer, suited for a special occasion of the year.

Palin is the author of Onewashopping.com. If you would like more information about Price Comparison Services, please visit http://onewayshopping.com.

Article Source: http://EzineArticles.com/?expert=Palin_Mergrego


Reader's Digest Complete Photography Manual: A Practical Guide to Improving Your Photography

500 DIGITAL PHOTOGRAPHY HINTS, TIPS; The Easy, All-In-One Guide to those Inside Secrets for Better Digital Photography

Thursday 17 December 2009

Why Don't I Look Good In Pictures?

Some people don't – and for very real reasons...

I've been taking professional photographs for about thirty years. Ever since I started, I've heard a constant comment. It is always said something like "I just don't take good pictures" or "the camera just doesn't like me." Almost invariably, when this statement is uttered, everyone within earshot gives a chuckle, or immediately starts assuring the speaker that they really do look good. Sometimes it's true, but often it's not...

Some people do not photograph well – it's that simple.

To the best of my knowledge, nobody has ever been able to compose a list of physical features that cause someone to photograph well, or photograph poorly. Game show guru Monty Hall believed that the secret was in the size of the head. He insisted that all of the hosts of his shows had large heads. Obviously, this worked for him – his unmatched success attests to that.

Hollywood stars and starlets are very persnickety about how they are photographed. There are extreme cases, such as actor Alan Ladd. Mr. Ladd was quite short, and insisted that trenches be dug throughout the sets to make him always appear taller. When a trench wouldn't do, he had stools. Barbra Streisand goes to great lengths to ensure that only one of her profiles is photographed. Note that she will always have her escort on her right arm – to cause photographers to shoot her from the left side – her best side, according to the singing actress.

If you've looked at enough photographs, and seen enough TV and movies, you've been struck by one or two anomalies. Someone who is frightfully unattractive looks great in a photograph, or, someone who is stunningly attractive looks horrible. What causes this? Is the photographer lacking skill? Bad lighting, perhaps? Did the subject have a bad day? Of course these things could be true, but there's actually a very real, constant explanation for this phenomenon: dimensions.

We humans live in a world of three dimensions: front/back • left/right • up/down. Since we have stereo vision, we can see all three of these dimensions. Using geometry, we can see how the dimensions are arrived at. A straight line is one dimension: front back. To create the second dimension, make a line at a right angle to the first line, and do so until you have a square. This is two dimensional. Now, make squares at right angles to the first square until you have a cube – that's three dimensional. Voila!

We suspicion that there are more dimensions. Using the first three dimensions as the guide, if you took a cube and made cubes at right angles to it, ultimately you'd have a 4-D cube – sometimes called a hypercube, or "tesseract." The problem is, we can't even imagine a tesseract, much less make one. It's all theoretical. Some things in geometry are hard to grasp, but a tesseract is impossible to grasp.

One of the problems we have in understanding geometry is simply this: a two dimensional object, such as a square, has absolutely NO depth (thickness) at all. This means that it is completely invisible when looked at from the side view. But what's this all got to do with why you don't look good in photographs? Simple: people are three dimensional, and photographs are only two dimensional.

Anytime that you lose a dimension, your view is penalized, per se. If I take a head-on photograph of a cube, it appears as a square. I can do some 'tricks' to fool the viewer, such as make sure there is a shadow showing that the square is actually a cube, or taking the photo at an angle which shows at least one other side of the cube. But no matter what I do, the picture will always be a two dimensional view of a three dimensional object. Needless to say, there is a substantial difference between a square and a cube. And there is a substantial difference between seeing someone and seeing a picture of that same someone.

In people, all sorts of things affect how we perceive them. Many of these things are only present because of the third dimension. The distance between the ears and the tip of the nose, the depth of the eye sockets, the distance the nose and chin protrude from the face, and so on. None of these elements of a person's appearance are necessarily discernable in a photograph, and yet they are easily seen in person.

Some people are attractive because of the 3-D elements. Others do not depend on 3-D elements so much for their attractive appearance. And some people have such a string feature that is visible in 2-D, that any loss of 3-D is not very noticeable. Paul Newman, for example, was quite famous for his striking blue eyes. Blue is not dependant on dimension. Try to find a professional photograph of comedian/actor Jimmy Durante that did not emphasize his notoriously prominent proboscis. In a frontal view, he was just a mediocre looking fellow, but when his face was photographed to accentuate his large nose, he became quite unique.

If you or someone you know doesn't photograph well, take heart. You might try getting a digital camera and shooting picture after picture – each one showing just a modest shift of the angle of the head. Don't just change the angle side-to-side, but up and down as well. Looking slightly upward changes everything, as does looking slightly to one side. Do this in full, but not direct light – such as under your porch, or on a cloudy day. Don’t use the flash! If this doesn't achieve the desired result, try the same thing, but have a prominent light source. You can do this by pointing a light directly towards yourself, or by sitting in a darkened room, with only one light source in the room.

The techniques above will help to exaggerate the illusion of 3-D in the 2-D medium of the photograph. Do this enough, in enough positions and with enough lighting changes, and you just might be able to get back those good looks the camera's 2-D limitation has stolen from you. All the best!

www.edityourdigitalphotos.com


Friday 11 December 2009

How To Fix Underexposed Photos

Here’s a great video video tutorial, which shows you how to fix underexposed photos - incredibly useful to know.

(Remember this is a lower quality “YouTube” version of one of the video tutorials taken from the full edityourdigitalphotos.com set, the full set are much higher quality of course.)

If you feel like it, you can leave your opinion on this video in the “comments” section bvelow, I’d love to hear from you.

Just click the play button to watch…


For a free guide with many more tips got to www.edityourdigitalphotos.com

Wednesday 9 December 2009

Video Review of "Photoshop Fast Track for Digital Photographers

Seller: www.edityourdigitalphotos.com


Summary:

"Photoshop Fast Track for Digital Photographers" is a collection of 22 videos, which demonstrate how to edit digital photos using Photoshop. Each video is a step-by-step tutorial of the most common image editing tasks in Photoshop.

Product Details:

The main product is a set of 34 instructional videos. These include 12 video tutorials for Photoshop, from Photoshop 7 through to the later versions bundled with Creative Suite products (CS2 and CS3). Most of the videos are less than 5 minutes long. The longest video is 12 minutes and 48 seconds.

The topics for Photoshop 7 through CS2 are:

- Change Eye Color
- Change Hair Color
- Fix Underexposed Photos
- More Punch Photo
- Instant Tan
- Panoramic
- Double Chin
- Remove Red Eye
- Remove Spots and Blemishes
- Remove Unwanted Objects
- Remove Wrinkles
- Whiten Teeth

The topics for CS3 are:

- Batch Rename
- Batch Resize
- Change Hair Color
- Double Chin
- Eye Color
- Instant Tan
- Look Funny
- Look Slimmer
- More Punch Photo
- Photomontage
- Red Eye Removal
- Remove Spots and Blemishes
- Remove Unwanted Objects
- Remove Wrinkles
- Replace Backgrounds
- Selective Color
- Smooth Skin
- Soft Romantic
- Straighten Image
- Fix Underexposed Photos
- Whiten Teeth

"Photoshop Fast Track for Digital Photographers" also includes the following bonuses:

- Video tutorial images: These are the exact same images edited in the videos. The customer can work on the same images and practice the skills each video demonstrates.

- Flickr tutorials: A step-by-step guide on how digital photographers can make the most of this free site to share (and show off) your photos. There are 14 videos on Flickr alone.

Format: Online video in both Flash and Shockwave formats, which can be viewed online and downloaded into the user’s hard drive The tutorial images are digital image files (JPG).

The Flickr tutorial is in online video format as well.

Thoughts on the Product:

Whether you edit digital photos for fun or for work, these video tutorials will make the tasks much easier.

Photoshop is a powerful graphic editor, but the learning curve can be pretty steep. You could spend hours learning everything yourself, or pay for a class. Or, you could watch these videos and learn the most common digital photo editing tasks at your own pace.

Video demonstration is an excellent way of learning a complicated software such as Photoshop. It’s like looking over the shoulder of an instructor - but one that you can pause, rewind or fast forward as needed.

The best way to use these videos is to have Photoshop open in another window, pause the video to complete each of the steps demonstrated, and then compare your final result with that of the video. Because the tutorial images are included, this is easy for users to do. You get instant feedback and practice.

The tutorials are for different versions of Photoshop, from Photoshop 7 to CS3.

Where to Learn More: www.edityourdigitalphotos.com


Monday 7 December 2009

Photo subjects that sell


What sort of material is selling best on stock photo sites?

There's no real standout answer to this question - every sale seeems to be totally different to the last!

There are some regulars though....

Anything with people in it! These aren't necessarily "portrait" pics - they are more likely to be classed as "lifestyle" images.

People doing things - so it doesn't matter how you currently classify your work, if you can start including a few people you are probably going to improve your sales ability!

Other regular subjects are nature, wildlife, industry, technology, sports and communication, but even these are only part of the picture.

Perhaps the person who can best answer this question is you!

Only you really know the type of work you do; the subjects and styles etc, so you need to do some market research yourself and look for situations where your images could have been used.

Get in the habit of studying the images you see around you every day ... books, magazines, websites, billboards, packaging, junk mail! ... they are all commercial images and they are all selling. Pay particular attention to those subjects that overlap with your current work.

The trick is to then apply what you learn to your own work ... look for the elements within the images that make them work; think about why the buyer would have selected that image, and how you could improve on it.

This is regardless of which stock photo site you choose to sell your work through.

Make this a habit and you'll not only get a better idea of what's currently selling, your own work will become more saleable in the process!


Discover Further Photography Techniques By Reading This Free Digital Photography Report – www.LearnDigitalPhotographyNow.com

Thursday 3 December 2009

Top 10 Digital Photo Quick-Fixes

Digital photography has made taking professional-looking photos within the reach of even the rank beginner. Aside from the ease of use and rich features digital cameras themselves offer, we're able to edit our digital photos easily.

Turning an image from ok to extraordinary is only a few clicks away, thanks to digital image editing software like Adobe Photoshop. If you're interested in mastering the top software for editing photos, click the image (or link below) to find out how you can learn Photoshop in 2 hours or less www.edityourdigitalphotos.com.

Here are 10 digital photo quick fixes you can make to make your digital pictures stand out.

1. Remove red eye

Red eyes make your pictures look amateurish. Why put up with it when it's so easy to fix? Take the time to remove red eye from portraits.

2. Sharpen blurred images

Sometimes you've captured the perfect moment, but your hand shook or the subject was moving too fast, or the scene didn't have enough light. The result is a blurry or out-of-focus picture. It's still possible to salvage blurred pictures using image editing software like Photoshop.

3. Fix the exposure

Another quick fix is making sure an image has the right exposure. That is, it's neither too light nor too dark. Adobe Photoshop and other image editing software makes fixing exposure super easy.

4. Crop the image

The simple act of cropping an image can improve it significantly. Crop an image to achieve better composition and remove unwanted elements from the background.

5. Remove spots and blemishes

A blemish can mar an otherwise beautiful smile on a portrait. All it takes is a few clicks to give your subject a perfect complexion.

6. Remove unwanted objects

Sometimes a picture would be perfect... if only that flagpole didn't look like it was growing out of your subject's head! Take out distracting elements from your digital images.

7. Smoothen skin

Use Photoshop's Healing Brush tool to minimize wrinkles and give your subject a more youthful appearance. Edit Your Digital Photos gives a step-by-step video tutorial of how to use it and still get natural, believable results.

8. Straighten the image

A common mistake in digital photos is to have a crooked photograph. This is obvious when a photo includes the horizon - make sure it's level. If it isn't, then edit the image to straighten it.

9. Whiten teeth

This is another way to make your portraits stand out. It's easy to whiten your subject's teeth with Photoshop's Dodge tool - but don't overdo it. Keep it realistic.

10. Correct colors

Is the picture too orangey? Or too green? Or would it look better if it were cooler or warmer? You can easily adjust color levels to achieve the effect you want.

Next time you're about to share or display your pictures, go through this list of quick fixes first. Each one takes only a few minutes to do, but you'll have much better pictures.

Want step-by-step tutorials on using Adobe Photoshop to edit your digital pictures? Find out how you can get your own personal Photoshop tutor. Go to www.edityourdigitalphotos.com

Wednesday 2 December 2009

Basic Photography – How To Add Special Effects To Photos With Adobe Photoshop And Basic Photography Tutorials


StopIn an effort to create a lasting impact from your photo, leaving the impressions on viewer’s minds, it should have something that keeps him glued. You can employ Adobe PhotoShop’s special effects tools in the menu to add a lightning effect. You can double your exposures or do whatever you choose. The advantage of owning Adobe Photoshop is the rewards it will bring. In fact, I used this program to design my book covers, make commercials, advertising slicks and more, so sit back and enjoy this basic photography course.

Lightning Effect: You can use various types of lightning effects and of different colors, applying them to an image using Adobe Photoshop. This will enhance your basic photography skills tremendously. Note that these tips are perfect for newbies as everything is explained in basic photography terms.


How to do it:-

We’ll follow a stepwise manner in doing this:

1. Open your editor or Adobe Photoshop program

2. Now open the desired image (make sure you open it in RGB format)

3. Now from the filter menu choose Renderer and then select your desired lighting effects.

4. You will see the lighting effect dialogue box opens up.

Then..

1. Choose the desired lighting style from the topmost selection menu; you will notice the options style of lights.

2. Choose the light type and move the sliders to set the intensity and focus.

3. You can also change the properties by toggling the sliders for glass, material, exposure, and ambiance.

4. You can also change the color of light. To change the color of light just click on the boxes to the right of the light type and properties. This will open the color, picker dialogue box. Choose a color and press ok.

5. To change the direction or placement of light just drag any of the points on the outside ellipse or center point. Click ok after you have adjusted the direction and placement of light. How about that for a basic photography lesson!

Creating Double Exposure effect is one of the best basic photography tips: A double exposure image is created by overlaying two images on one another.

Like above we’ll again follow a stepwise procedure:

1. Select all or a part of the image using the selection tools at the top of the toolbar.

2. Now from the edit menu choose copy.

3. Now open a second image file.

4. From the window menu, you can select the show layer.

5. On the ‘show layer’ popup right click and choose new layer and press ok.

6. Now go to the edit menu and press paste.

7. From the layer’s palette, move the opacity slider to 50%.

8. Now drag the mouse from inside the selection to move it.

9. To scale the pasted selection, click on image menu and then select image size. Adjust the size by adjusting the pixels and height from the pop-up window.

The editing programs today can do wonders to images. One of the most popular programs is Adobe PhotoShop, since this editing program is one of the most sophisticated tools. Most pro photographers will use this program, since you can create web sites, book covers, images, movies, and more. Adobe is also used to design manuals, graphics, commercials, fliers, and more. This particular program I miss. I lost my copy during a severe virus attack, and the downside is it costs around $1000 to $1500 to replace.

Outside of lightning effects, you can also setup brick backgrounds, or whatever background you choose. If you own this program you know what I am talking about, however if you have never had the experience and can get the opportunity to try out Adobe I promise you will have loads of fun. For additional editing assistance check out your menus, Help tools.

Discover Further Basic Photography Techniques By Reading This Free Digital Photography Report – www.LearnDigitalPhotographyNow.com

Thursday 26 November 2009

How To Prepare For A Photo Shoot

by Michael Kryzer

One of the keys to being a good freelance photographer is being well-prepared. The following tips will help you to be ready for your next big photo shoot.

1. Plan Your Photo Shoot in Advance

Brainstorm before you go and make a list of all the photos, subjects and angles you want to shoot. Consider the places, attraction, activities, and scenery. Consider the people and poses. Evaluate possible backdrops and lighting conditions.

2. Be Familiar with Your Camera's Features

It is a good idea to read through your camera manual again so you know all the features that your camera offers. You might be surprised to discover a feature that you haven't used for a while or that you had forgotten.


3. Always Test Your Camera

It is vital to know that your camera is functioning properly. If you shoot with film have not used your camera for some time, then shoot a short roll with several pictures and have it developed. With digital camera take some shots and upload these to your computer to check that everything is working satisfactorily. There is nothing more embarrassing than discovering at the shoot that your camera does not work.

With digital cameras, make certain that the resolution is on an appropriate setting. There's nothing worse than discovering after the shoot that your digital camera was still on the smaller, lower quality resolution you used last week to take some funny shots of your dog.


4. Check You Have Sufficient Photo Storage

Be sure to pack plenty of film. For digital cameras make certain that you have sufficient storage disks or cards to hold all of your photographs at a high resolution.


5. Charge Your Camera Batteries

Be sure your camera has fully charged batteries and always take some spares. Don't forget to pack the power cord so you can recharge your camera on the go.

6. Clean Your Lenses

Always clean a lens using a proper lens cleaning brush. By doing this you will be able to remove fingerprints and dust particles without damaging the lens.

7. Pack Your Accessories

You'll need your charger and cables to connect your camera to your computer. Depending upon your camera model you will probably need to take a combination of lenses and filters as well as your flash. Don't forget a plastic bag in case you need to protect against moisture.

8. Take a Back Up Camera

Always take a back up camera to an important photo shoot. You might consider taking a one-time-use, waterproof camera which will serve as an emergency backup as well as being useful for any beach or underwater shots.

9. Check the Weather Forecast

Check the weather forecast in advance, and prepare contingency plans just in case it doesn't turn out as expected.


Now you can ensure your next big photo shoot is a good one. You cannot be a successful freelance photographer unless you consistently take good photographs. To do that requires good planning, so remember to follow these tips, and all the best with your next photo shoot!


About The Author

If you would like to start your own freelance photography business and learn how to sell your photos, please visit http://www.CameraCareer.com

You'll discover all you need to know including which photos to take and how to get the best fees possible for your photos.

Monday 23 November 2009

Freelance Photography – 3 Ways to Sell Your Photos

by Michael Kryzer


If you love photography then a career as a freelance photographer is well worth considering. If you want to start a business in freelance photography there are three main ways to sell your photos.


1. Stock Photography

Stock photography refers to a stock of existing photographs that can be licensed for specific uses. Publishers, magazines, advertising agencies, filmmakers, web designers, and graphic artists are all examples of users of stock photography. They can use stock photography instead of hiring a photographer to shoot the photographs they need.

As a photographer when you take photographs those photos become a part of your “stock”. As the copyright holder you can license the images again and again. Your stock photos can be sold online through stock agencies and microstock sites, or by approaching publishers and other users directly, or you can sell them through your own web site.


2. Photography Products

You can take your photographs and create products for sale. Some examples of possible photography products include posters, prints, postcards, t-shirts and even books.

At CafePress, for example, you can design a wide variety of customizable products using your photos with zero upfront costs and zero inventory investment.


3. Photography Services

Another way to work in freelance photography is sell your skills, to sell your services as a photographer. In this capacity you could work on assignment for portraits, for weddings, or for various types of business project.


If you only want to work part-time at your photography, then working as a freelance photographer is still a great way to earn a little extra cash or to pay for your next digital camera or lens.


About The Author

If you would like to start your own freelance photography business and learn how to sell your photos, please visit http://www.CameraCareer.com

You'll discover all you need to know including which photos to take and how to get the best fees possible for your photos.

Sunday 22 November 2009

Who Will Buy My Photos?

"Who will buy my Photos?" is the question that many skeptics ask and it's a very valid question for anybody thinking of investing their time and resources in a new business venture. Well that list would have to begin with Web Masters who are constantly looking for images for promoting their online products and promotional materials.

Then you have traditional marketing and advertising agencies that need photos on all kinds of subjects for producing posters, billboards, leaflets and calendars. Basically in today's marketing industry the internet is virtually the only source for finding photographic images which serves millions of people all over the world.

money3-main_Full_1.jpgIf you want to make money with your photos on the internet you don't have to be technically minded. It really is simple and mainly involves just downloading photos to your computer and then uploading them to our recommended photo money making sites.

The techniques are very interesting and you might be surprised at how they really do work. In order to not scare you off at this point here's what they're NOT about:-

1. You DON'T need fancy or expensive camera equipment.
2. You DON'T need to be a professional photographer!
3. You DON'T need a website or any technical skills!

So bearing that in mind, these are the main reasons why you don't have to be technically gifted to make money with your digital photos:-

1. You can snap photos from anywhere in the world!
2. You get to work from home and choose your own hours!
3. No experience necessary - if you can take an average picture, you can make money with this system!

The reason these techniques are so effective is because they are the basic secrets to turning your photos into an additional cash income. Turning your photos into cash skills will be made so simple with the advice given by these training articles and the fact of the matter is that anybody could do this successfully.

Another great advantage with this online photography business is that you don't need years of training and that you will be making real money from your digital photos in no time at all.

Click here and learn how you can make an extra $200 to $5000 selling digital photos online…..

Thursday 12 November 2009

Top tips for landscape photography...


1. Harmonious thirds


The rule of thirds is a well-known method of framing images. Where the horizontal and vertical lines
a third of the way through the image frame intersect are the most 'powerful' points in the composition.

2. Using reflections


Unlike the rule of thirds, ref
lections benefit from symmetry. However, a standard 4:3 frame may need to be cropped into to provide the optimum composition - something to consider when out shooting.

3. Looking high or low


Rarely is the best viewpoint from eyelevel. Try lowering your camera to get closer to the ground or, better still, find a high vantage point to produce truly stunning images of even the most usual of subjects.

Tuesday 10 November 2009

The Art of Organic Photography

This article is all about Organic photography.

Get 20% off office photo gifts when you use the coupon code 20OFFGIFTS

Photography is a hobby for many but a passion for a few. In our day to day lives, most of us simply enjoy taking pictures, uploading them to the web, sharing them and preserving them for generations to come.

Photos are our way of looking back and cherishing those special moments in our lives - those special moments captured never to return. Being successful in taking pictures and making them seem real is an art on its own - a separate art from the typical point-and-shoot snapshots - and it is only certain people who can capture the moment and make the picture speak more than a thousand words.

It is not only children who like to have their photographs taken but also adults, as it gives them a chance to capture a moment and treasure it forever.

Looking at soft, warm pictures, full of emotions, always melts one’s heart and it is a feeling which can forever be preserved and treasured whether offline or online in galleries such as flickr or photobucket. In and around San Francisco Bay Area, in places like Palo Alto, Berkeley and Oakland are homes to many families from very diverse ethnicities and cultures, who enjoy having their portraits taken - both adults and children alike.


Talking about renowned photographers, we must make a mention of Anat Reisman Kedem (also known as Anat Kedem), who is one such lady for whom photography is a passion and a way of life. She lives in Foster City, near San Mateo, San Carlos, Belmont and Burlingame in the San Francisco Bay Area in California, USA - and specializes in taking pictures of babies, toddlers, children (kids), pregnancy, maternity and families.

Anat Reisman Kedem has been recognized many times for her skills - and has a track record of shooting quality pictures, unique photos in natural lighting and surroundings in places such as Menlo Park and Sunnyvale, home to Silicon Valley companies, such as Intel, Cisco, SanDisk and Adobe - as well as the Great America park and the Round Table Pizza chain of restaurants.

Hillsborough, Atherton, Los Altos are beautiful small towns and home to generations of families living together. Natural settings as such can really make photos stand out - whether everyday photos or holiday season photos for Christmas, Hanukkah and other holidays where family pictures are a joy to share.


Anat Reisman Kedem summarizes it best when she says:

"I believe in taking pictures in a soft, natural ambiance and lighting, creating an atmosphere which adds depth and dimension to my photos. To that end, I generally try to photograph either in the late hours of the afternoon or in the early morning hours when the sunlight romances the lens. While photographing, I will seek the alternative angle, that special look, an honest expression, or a captivating smile. Pre-orchestrated or directed poses are practically out of the question. I simply don’t believe in doing things this way."


Located at the tip of the Bay Area is Los Gatos, which borders with San Jose, San Carlos and Santa Clara. This town has many small and large families, with a setting that serves as a real time, amazing backdrop and opportunity for taking photographs which showcase the town and its lovely residents. The suburban town of San Mateo is part of the Bay Area and has many country style houses which form the perfect setting for that cozy photograph. Known for the Coyote Point Park, its golf courses and beach - as well as its proximity to the San Francisco Airport (SFO), the ideal Mediterranean climate here paves the way for a calm and comfortable life. Sausalito and Tiburon in Marin Country, as well as Redwood Shores, Foster City, Alameda and Santa Cruz also provide waterfront scenic backdrops like nowhere else - a perfect setting for perfect photos.

A person can not only enjoy the visuals but also learn more about a person through photographs. And in this way Anat has gone to prove that it is not necessary to have studio lighting, layers of makeup, or a designer dress for a person to look great and resonate warmth - be yourself and let your personality and natural aura shine through the photos, taken in a natural setting with no "artificial preservatives" of any kind. In a sense, it's organic photography. And it's a talent only a few photographers possess
.


Encyclopedia Of Twentieth-century Photography


Encyclopedia Of Twentieth-century Photography

Thursday 5 November 2009

More Photography Quotes

Here are some more quotes from more or less famous photographers revealing what they think of the art of photography. Enjoy!

"Sometimes I do get to places just when God's ready to have somebody click the shutter." ~ Ansel Adams

"When you photograph people in colour you photograph their clothes. But when you photograph people in B&W, you photograph their souls!" ~ Ted Grant

"The world just does not fit conveniently into the format of a 35mm camera." ~ W. Eugene Smith

"A good snapshot stops a moment from running away." ~ Eudora Welty

"Every time someone tells me how sharp my photos are, I assume that it isn't a very interesting photograph. If it were, they would have more to say." ~ Author Unknown

"My portraits are more about me than they are about the people I photograph." ~Richard Avedon

"There will be times when you will be in the field without a camera. And, you will see the most glorious sunset or the most beautiful scene that you have ever witnessed. Don't be bitter because you can't record it. Sit down, drink it in, and enjoy it for what it is!" ~ DeGriff

"You don't take a photograph, you make it." ~ Ansel Adams

"Photography is a way of feeling, of touching, of loving.
What you have caught on film is captured forever... 
it remembers little things, long after you have forgotten everything."
~ Aaron Siskind

Friday 16 October 2009

Photography Quotes You Should Know

“The important thing is not the camera but the eye.” - Alfred Eisenstaedt


"There are two people in every photograph: the photographer and the viewer”
- Ansel Adams


BNDL: ACP MASTERING DIGITAL PHOTOGRAPHY


The Photography of Gustave Le Gray


The Chemistry of Photography


Photography


Secrets to Making Great Pictures (National Geographic Photography Field Guides)


Photography: A Cultural History (2nd Edition)


PHOTOGRAPHY FOR THE 21ST CENTURY-E.RESOURCE

Thursday 15 October 2009

Eye-Fi now makes cameras wireless(!) in the UK

Say goodbye to cables – with Eye-Fi, memories go directly from the camera to the computer and the web

Eye-Fi Inc, maker of the world’s first wireless memory card for digital cameras, today announces that it will launch its much anticipated Eye-Fi wireless memory cards in the UK on October 19th 2009. Eye-Fi cards make saving and sharing memories effortless by allowing users to wirelessly upload photos and videos to their computer and the web. Eye-Fi cards allow users to take photos and videos anywhere (like their existing memory card) and automatically upload their photos and videos as soon as the camera is within range of the user’s Wi-Fi network.

Jef Holove, CEO of Eye-Fi, comments: “Because Eye-Fi eliminates the time and hassle, more than half of our users upload their photos and videos within 24 hours of capturing them. So, those memories are backed up, organized and shared with friends and family while they are still fresh.”

Three Eye-Fi cards will be available in the UK with a range of features: the Eye-Fi Home Video, the Eye-Fi Share Video and the Eye-Fi Pro, offering easy uploads and feature sets for every photo lover, from the simple snapper to the photography enthusiast.

Eye-Fi Home Video – automatic photo and video backups to the computer

Don’t wait months to backup photos and videos to the computer. The Eye-Fi Home Video card saves users time by wirelessly uploading JPEG photos and videos from their camera to their PC or Mac. Being organized with memories is made easy, as Eye-Fi will upload to any folder on their computer and arrange photos by date ¬Mac users can even upload directly to iPhoto. Flaunting 4GB of memory, the Eye-Fi Home Video stores up to 2,000 photos or 90mm of video and provides automatic backup to the computer thanks to its wireless capabilities.

Eye-Fi Share Video – wireless saving & sharing on the Web

Get family and friends updated automatically. The Eye-Fi Share Video card makes saving and sharing effortless by automatically and wirelessly uploading photos and videos to the user’s computer and to the web. Users can pick where their memories go, and can choose from popular websites like Flickr, Facebook, Picasa, MobileMe or YouTube – no need for the computer to be turned on for memories to be shared online. Don’t want to share it all with everyone? The Selective Transfer option, available for all Eye-Fi cards, enables users to control which media will be wirelessly uploaded.

Eye-Fi Pro – streamlining the workflow

Photo enthusiasts and professional photographers can now streamline their workflow. The Eye-Fi Pro card wirelessly uploads JPEG, RAW and video files to any folder on a computer (PC or Mac) and to the Web. Photographers on-the-go can also take advantage of its direct to computer (ad hoc) connectivity capabilities for direct uploads from camera to the computer without the need for a router. Organizing is made easy through lifetime, automatic geotagging (using Wi-Fi Positioning System or WPS), which enables users to view, search and share photos on maps and take advantage of a seamless integration with iPhoto ‘09.

Breakdown of Benefits:

Eye-Fi’s complete line-up of wireless SDHC memory cards range in price from £49.99-£119.00 and are available at Amazon, Apple, Computer Warehouse and Dabs.


Eye-Fi 4GB Wi-Fi Pro

Eye-Fi 4GB Wi-Fi Pro


Saturday 19 September 2009

Report highlights the growing assault on citizen photography

Growing problems with citizen photography - A new report just out brings the problems photographers face back into the spotlight.

"There is no overarching ban on photography, but there has been a creeping restriction of everyday photography," the report says.

The report highlights there are 'no-go' areas and 'touchy subjects' that are restricting citizen photographers.

The report says: "As a result, many children are growing up with gaps in the family photo album – no sports day or first swim photos - and as a society we have big gaps in our archives."

The study was compiled and written by Pauline Hadaway, director of Belfast Exposed gallery, and published by the Manifesto Club who 'campaigns against the hyperregulation of everyday life'.

The report highlights the 'terrorist threat' hysteria that currently surrounds photography and the growing concerns about photographing children. The reasons given for these photography restrictions are rather vague and according to the group, legally questionable.

The report said how several citizens were told they must have written permission to film in an airport or train station, a member of the public was told that he needed a 'licence' for his camera and parents were told that photos of their children's nativity play could end-up on a child pornography website.

After several more examples, the author finishes the report by saying: "Much of the contemporary paranoia around photography appears to be driven more by vague suspicion than by any real and present danger...it is time to stand up for citizen photography against the antidemocratic impulse to police the public gaze."

Tuesday 8 September 2009

Photography: From Hobby To Your Very Own Business

For the transition of photography from hobby to your very own business, there are several tasks that you have to accomplish.


That’s right. Who could say that there’s no chance that your hobby could also be the foundation of your first business venture? There are a lot of people out there who are in need of a good photographer to capture images of their son’s wedding, their daughter’s graduation or their very own wedding. Why couldn’t you be the one to supply your photography services to their needs?


For the transition of photography from hobby to your very own business, there are several tasks that you have to accomplish first.

Market Your Photography Skills – Sell yourself, in other words! Let people know about what you can do in the field of photography, why they need your skills and why they should hire you. Make sure, however, that you charge them reasonable rates since you’re still more or less an amateur in the field of photography.

To effectively market your photography skills, don’t be afraid of spending a little money on posting ads in the classified sections. Don’t stop there but post about your photography business in as many places as you can.

Join Interest Groups – This could be the local photography club in your community or the association of young photographers in your school. It could also be a Yahoo Group that you could easily join.

Usually, these groups are able to hold regular or annual exhibits of their works and it wouldn’t hurt to expose to the world the beauty of your works in photography.

Join Photo Competitions – Two things that you could enjoy when joining photography competitions: fame and fortune. Both are equally important. Fame would do wonders to your career in photography because it would let the world know about your skills and winning a photography competition may also offer the prize of having an apprenticeship under a world famous photographer. And when it comes to wealth – well, when did extra money ever hurt?

Offer Your Skills For Free to Government Projects – The government is always on the lookout for professionals who are willing to work for free and you should take advantage of this. Offer your photography skills for free because this would give you the opportunity to show them what you got.

Offer Samples of Your Work to Newspapers and Magazines – This is just like joining a photography competition. When you offer samples of your work to newspapers and magazines, you’re improving the chances that you’ll get noticed by the people who matters.

Although we can’t say that the road to victory is easy, never give up, never stop taking pictures and you’re sure to go far!


Learn Digital Photography
Highly effective and unique teaching method. Beginners to pros. Free demo.

Friday 10 July 2009

Take Photos That Sell

If you want to make money with stock photography you'll have to follow some basic guidelines, no matter if you shoot for a micro stock site or a traditional stock photography agency.

Shoot photos that sell

That's by far the most important point. Would you pay for an image of your neighbors mother-in-law? Or of his dog? Of course not! No one would, perhaps not even your neighbor himself.

Likewise professional photo buyers don't care for that kind of images. What they ...


... are looking for are photos that illustrate concepts, like career, relationship or retirement. Business related photos generally sell very well. Photos of handshakes sell well because shaking hands is a universal, widely understood idea that can be used to illustrate negotiations, contracts, treaties and even things like breaking-up or divorce.

Travel photography can sell well if it can be used to illustrate concepts. For example, a photo of the Houses of Parliament in London can be used to illustrate democracy or governmental topics.

Avoid legal pitfalls

Most stock photography agencies have strict rules regarding images of people (if the people in the photo are recognizable), property (if the image of the property can lead to its owner, e.g. a license plate on a car), and
trademarked logos or items anywhere in the image. If in doubt, don't submit such images.

If you want to sell images with recognizable people in them, all agencies will require you to provide a so called "model release". A model release is a document with which the photographed person permits you to sell the image without need of compensation. Obtaining a signed model release from ordinary people is next to impossible, so you might be better off to either weed those images out or hire professional models.


Keywording is the key to success, literally

No matter how good your photos are, they won't sell if no one can find them. All stock sites let you tag or keyword your images. A good approach to keywording is to answer six simple questions for each image: Who? What? Where? When? Why? How?

For example, let's suppose you have a bunch of nice healthcare related images, shot in a hospital. Answering "Who?" you might find "doctor", "nurse", or "patient". Answer "What" to come up with "lancet" or "stethoscope". Answering "Where" yields "hospital", "waiting room" or "theatre", while "When" gives "morning", "afternoon" or any other time of day or year. Ask yourself "Why" to evoke concepts like "sickness", "comfort" or "patience". Finally "How" can refer to the photographic technique involved: It could be "black and white" or "monochrome", it might be "blurred" et cetera.

Keep the noise down

Always keep in mind that the end user of your image may want to print it out eventually. The larger the print size the more noticeable noise will be. Noise is induced by your digital camera's sensor and is something digital photographers have to live with, much like traditional photographers had to live with film grain. Generally speaking the smaller (area wise) the sensor size and the higher the ISO sensitivity the higher the noise will be.


For further info about stock photography, please see my previous post your-digital-camera-is-money-maker, as well as the products below.

P.S. Due to technical 'hitch' my photography store is down at the moment. Will try to sort as soon as possible.


Photo Stock Notes


Photo Stock Notes

Photo Stock Notes


Photo Stock Notes delivers eight pages each month, packed with information of top priority for the freelance stock photographer, condensed to its essentials. The eight tightly written pages of Photo Stock Notes bring you vital facts, trends, reports, latest strategies, that you can use immediately, in your taking, making, and selling of photographs and in the operation of your stock photography business. Because you have little time for lenghty articles, the reports in Photo Stock Notes are brief, pithy, and give the essence of each issue or subject. Whether you are just starting out or starting over, Photo Stock Notes will be a monthly refresher for you. Renew your current Photo Stock Notes subscription and your existing subscription will be extended by the number of issues you purchase. Order a gift subscription and we'll send a free gift card with your personal message to accompany your Photo Stock Notes gift subscription. You can also select the date to have us send your electronic gift card. You can also order other Photography magazines for yourself, or your business. We've got excellent prices for reception rooms and waiting rooms, professional offices like dentists, doctor offices, health clubs, gyms, beauty and hair salons. Get one bill and make just one payment for all your magazine subscriptions. We will send you a renewal reminder when your subscription is about to run out. Take advantage of our cheap Photo Stock Notes magazine subscription prices today and and have your Photo Stock Notes magazine delivered for a whole year.


People Shots That Sell-How to Succeed in Stock Photography

Monday 15 June 2009

New Store

Dear Readers

I've put together a new store for photographic equipment. Please have a look and let me know what you think!

www.marketing-aid.com/Photography-Store/

Thanks.

Krister

Thursday 11 June 2009

How to prevent 'Red-Eye' in photos

It happens to you all the time you take photos of family or friends just to find out later on that the eyes in the photos have a dominant redness to them. You are not alone - 'red-eye' photos are taken everyday by all of us. In this article we will try to understand why 'red-eye' happens and how it can be prevented.


Red-eye is a phenomenon that happens only when taking photos using a flash. When taking photos in day light or when in high ambient light scenarios people’s eyes look normal. When taking pictures in low ambient light scenarios using a flash the result many times is redness in the people’s eyes.

The reason for the color red is simple – when flash light from the camera hits the eyes it penetrates and is reflected back from the retina. The color of the reflected light is red because the light is actually reflected from the red blood in the retina.

In some scenarios the red-eye is evident while in others it is mild or doesn’t seem to appear at all. One of the main factors for that is the state of the pupils. If the pupils are dilated (for example the pupils dilate in darkness or when drinking alcohol) more light is reflected back from the retina and the eyes in the photo appear redder.

Common way to reduce red-eye

The most commonly used method to reduce red-eye is activating the camera’s built-in red-eye reduction feature. The red-eye reduction feature is very simple yet effective. When turned on the camera shoots a series of pre-flash strobes followed by one more strobe when actually taking the photo. The pre-flash strobes cause the pupils to reduce in size and by the time the photo is taken the pupils are small enough for the eye redness to substantially reduce.

The red-eye reduction feature does what it is supposed to do: reduce the red-eye effect but almost never is it completely prevented. There are many limitations to this feature; for example pupils reaction time to light can vary. In addition this feature can have a side-effect that results in photos having people’s eyes closed. The reason is that the pre-flash strobes blind the people and cause them to close their eyes.

Other ways to prevent red-eye

Understanding what causes red-eye helps being more creative in preventing it. Following are some ways to prevent red-eye other than using the built-in camera red-eye reduction feature:

  • Increasing the light where photos are taken (for example by turning on the lights in the room before taking photos of people) causes people’s pupils to reduce in size and eye redness to reduce.

  • Point the flash away from the eyes. Since red-eye is caused by flash light reflected from the retina the best way to prevent red-eye would be to eliminate such reflection as much as possible. In most cameras the angle between the flash and the lenses is narrow (this is especially true for built-in flash and pocket cameras) causing most of the flash to bounce back from the retina to the lenses. Increasing the angle (for example by using an external flash) reduces the reflected light. You can also use a bounce flash – by having the flash light bounce off a bright surface (a white wall or a professional reflector) most of the direct reflection from the retina can be eliminated.

Red-eye can also be removed after photos were already taken by using photo processing software on your PC. Most digital cameras include a CD with PC software that embeds this feature. Although this method doesn’t eliminate the red-eye from the source it can result in a practically red-eye free photo. Some software are better than others some are manual while others automatically identify the red-eyes and process that area to revert to normal eye colors.