Sunday, 17 November 2019
How Improve Your Portrait Photography
Thursday, 10 February 2011
What Is Freelance Photography?

- stock photography and
- assignment photography

Part-Time Freelance Photography
- to find photography markets that pay the most in an area;
- to find out what specific photography types are in the highest demand;
- to transition to full-time or more focused niche photography; and
- to sell their own photos themselves
- A digital camera

- Internet access
- Know-How
What Is Freelance Photography?

How To Freelance Photography
.- A good thing to know is that the current growth explosion in the photography industry has a positive effect on freelance photography. The current demand worldwide for photos is not being met by current supply. Freelance photographers can profit from that growth.
- Freelance photography is perfect for home-based photographers. In fact, many people are choosing photography as a source of extra income. This is the perfect fit for the work-at-home-moms of the world.
- Knowing what is selling in the market is done through research. Research what is in demand, what are the prices, what is the most lucrative, what are prices, etc.
- Knowing how to shoot quality photos is critical. Again, it’s important to know the standards of the different photography niches. Standards of quality are a given. However, within some specific niches there are varying standards – that benefits the photographer that knows the differences.
- Editing photos ‘know-how’ is very helpful to the freelance photographer. Digital photos often needsome minor editing. (As a side note, digital photo editing is a photography niche that many knowing photographers freelance in.)
- In this digital photography world, knowing how to optimize (make easier to find) web pages, photos,titles, descriptions and keywords will help customers find your photos online.
- Knowing ‘where’ to start saves a tremendous amount of time (and money, sometimes – if you don’t know, you might purchase unnecessary expensive equipment that you don’t need).
- Both provide good ‘how-to’ information on where and how to start. Both also provide very good brief explanationsof the different photography niches. And you will be successful following the steps in both of them. One of them offersmore information about
successfully entering the stock photography market. A consistent source of income for the freelance photographer is selling their existing photos as stock. This one provides information on taking photos and selling them to magazines. The magazines’ guidelines, requests, prices paid, etc. are provided
- The other resource is also very good and very informative. This particular resource offers a 100% guarantee that their freelance photography course will make you money.
Wednesday, 15 December 2010
Posing Secrets - The Photographer's Essential Guide
Discover How You Can Quickly And Easily Produce The Professional Standard Portraits You've Always Wanted By Mastering The Secrets Of Camera-Friendly Poses
This Practical, Proven, Powerful System Will Fast Track Your Ability To Produce Expert Shots Every Time.
You Are Guaranteed to Never be Stuck For a Pose Again, Even If You Don't Know How To Get Started - Or You Pay Nothing!
Posing Secrets - The Photographer's Essential Guide Vol.1 is a newly released practical resource for creative posing that will quickly show you clear and comprehensive practical steps to produce and communicate a pose for any situation.- How to focus on the body to aid posing.
- The key to duplicating or creating any pose.
- The three letters that can build a pose (no, not A-B-C).
- Important points to consider for a reclining position.
- Exercises and suggestions to help analyze pictures and poses.
- Ten simple solutions when your model does not know what to do with their hands.
- How to avoid foreshortening of limbs.
- The three basic head movements that make a difference to your model's features.
What are people saying about Posing Secrets?
| I highly recommend this Posing Secrets Volume 1. It teaches the photographer how to pose every aspect of the subject from their head to their toes. Before I read the book I could only pose models with model pose cards, but now I can come up with my own posing ideas. |
I have just downloaded your Posing Secrets vol 1 and have spent the last hour going through it. All I can say is "Wow"! Before, I would go through magazines and look at the posed pictures in the ads in an attempt to learn new poses but I wasn't sure what I was looking for. The sections in your book on body lines and foot placement made total sense and now I know what I am looking for when I look at the magazines. Thanks again for a very good informative book on posing. |
| You are certainly on a winner here Malcolm, giving the experienced and novice photographer an entirely new way of looking at the human body. It was money well spent, and normally it is easier to get money out of a beggar than it is to get money out of me. |
Tuesday, 12 January 2010
People Skills for Portrait Photography
Software Cinema DVD-Rom: Training: Portrait Photography For Everyone

1. If using a tripod, compose your portrait and then take one step just to the side and forward from the camera. Do not look through the viewfinder as you capture your subject's image. This allows you to make eye contact initially with your subject, and then direct her in mood, expression, position, and the angle of gaze you are aiming for. When your subject interacts with your camera, the result can be a cold or lifeless rendering, but when you engage your subject through eye contact, expression, gestures and words, the result can be a warm and candid reflection, charged with mood or emotion.
2. If you are not using a tripod, you really should redouble your effort to maintain constant interaction with your subject. Many photographers tend to keep their eyes in the viewfinder of the camera, but this leads to your subject interacting more with the front glass in your lens than with you. Again, you do not want the sterile and lifeless rendering that most often comes when the camera serves to isolate you the photographer from your subject. Interaction with an inanimate object (your camera) can never be a substitute for interaction with another human being (you), when your goal is to capture the essence of your subject, and reflect the attitude and emotion she was feeling at that moment in time.
3. Allow your subject to be herself. A little girl dressed up in fairy wings for a special picture is very cute, and I suppose there is a place in this world for cute. But, contrast this with the little girl who just loves to dance. You put her in her everyday clothes, stand her in front of a plain backdrop, put on her favorite music and say to her, "can you show me how to dance to this song?" You should have no difficulty in capturing timeless expressions there. Now imagine a jeans and t-shirt kind of guy whose true passion in all of life is sailing. You dress him up in a tailored suit; formally pose him in front of a low key backdrop, seated in a Chippendale chair, and use classic loop lighting. What would be said of this portrait years later? "Who was this guy, an executive?" But just suppose, you photographed this same guy in his favorite t-shirt and blue jeans, at the helm of his beloved sail boat, on a beautiful late afternoon, just as the boat was coming about? What would be said of this portrait years later? "This was Charlie, doing what he loved most! That was such a glorious day." The point is, "keep it honest". Fantasy can be cute, but your subject being herself, years later this will be much more meaningful.
4. Allow your subject's expression to be honest. A frown or a grimace that is genuinely felt can be more interesting than a smile that is forced. I try to never just pose my subject and then say, "Okay, now smile for me." If you want your subject to smile then tell a joke, put on a face, or perhaps merely smile at her and she will smile back at you. People generally tend to reflect in their face what they see in yours, but in my experience this is not always so. Nevertheless, interaction with your subject is the key. That being said, the next time you have a difficult subject ask him to tell you a joke, to bring out a smile, if that's the expression you are after. If you are a professional, you know that smiles sell, but if you're an amateur, you are under no pressure to sell, so make your portraits interesting. Not everything in the world is to smile about.
5. Direct your portraits. Take control of the composition of your portraits! Do not be afraid to tell or show your subject what you want. Sometimes showing is best. I often find that actually demonstrating a pose I have in mind, works better than trying to direct my subject through words alone. If you are photographing a group, your life will be easier, if you arrange and pose the adults first. Then, work your way from oldest (or more mature and settled) to youngest of the children. The point to remember is, as the photographer, you should take charge of the shot. The success or failure of the portrait will be your responsibility, so take charge.
Engage your subject to establish and build rapport with her, to take your photos to a higher level. Make your portraits more meaningful by keeping them honest, and natural. We all know a fantasy photo can be cute, and a formally posed portrait can be graceful and dignified, if that is your subject's personality. But, a portrait that is true to the subject is always more meaningful. Allow your subject to be herself, and never force an expression. Learn to take charge and direct your portraits and you will move far ahead in your journey as a photographer. Practice your people skills with each portrait you take. People skills are the prerequisite to all else, if you want to take great portraits. Good day and happy clicking!
Thursday, 24 December 2009
10 Reasons to Turn off Your Autofocus
A Guest Post by Alistair Scott.
When I started using a camera autofocus was something out of science fiction. I mean … it would never work in real life, would it? Apart from anything else, how could it know what you wanted to focus on?

Now fiction has become fact, and pretty well every camera has AF as standard. It works, and works well. But it doesn’t always work perfectly. It can pick up the wrong thing or fail to find anything to focus on, causing the lens to ‘hunt’ back and forth. Sometimes it won’t even let you fire the shutter.
So, here are ten situations when it’s worth turning your autofocus off and going back to the ‘good old days’ of manual focusing:
1. When there’s not enough light
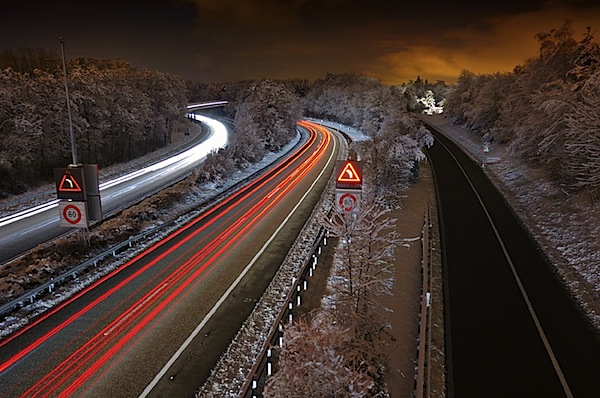
In low light, contrast is also low, and AF relies on light and contrast to latch on to things. Your camera may have an AF assist lamp built in. But, even if you have it switched on, it won’t work in situations like in the shot above.
Though the image looks bright enough, in reality there was little light, and it required a 30-second exposure.
2. When there’s not enough contrast
If your AF metering spot is on something like a plain-coloured wall the camera will find it impossible to focus, no matter how bright the light, and the lens will ‘hunt’. You can re-frame your shot temporarily so the spot is on something with detail and press the shutter half down to activate the AF. Then keep the shutter button half-pressed to lock the focus, and go back to your original composition. Or focus by hand.
3. Shooting wildlife
Most wild animals have excellent hearing and, no matter how good your autofocus, it will make a noise. Even the slightest whirr is likely to spook wildlife. Switch it off if you want those great, natural wildlife shots.
4. With landscapes
When shooting landscapes you usually want things in focus from the foreground to distant mountains. This means closing down the aperture to increase depth of field and focusing about a third of the way into the scene (at a point called the ‘hyperfocal distance’ where everything from quite close to infinity is sharp). Switch off the AF. If you leave it on, when you press the shutter it will re-focus … probably on those far-off mountains.
5. If you’re doing HDR
High Dynamic Range photography involves taking several shots of the same scene, all exactly the same except for exposure, then blending them when you’re back at the computer. It’s important to have identical focus in each shot to ensure success. With AF on, it may choose a slightly different focus point for each shot.

6. Fast action
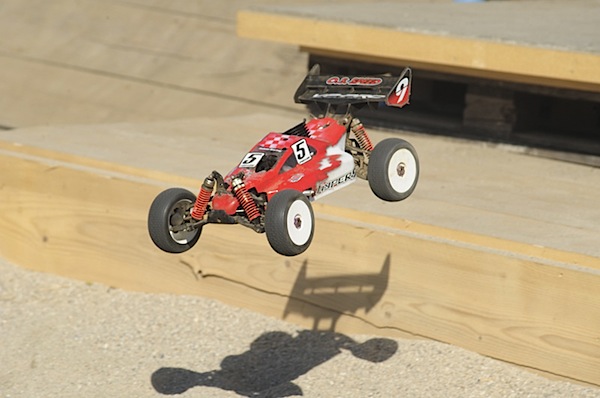
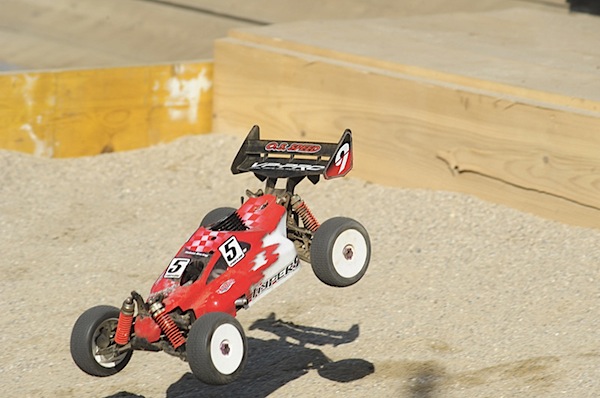
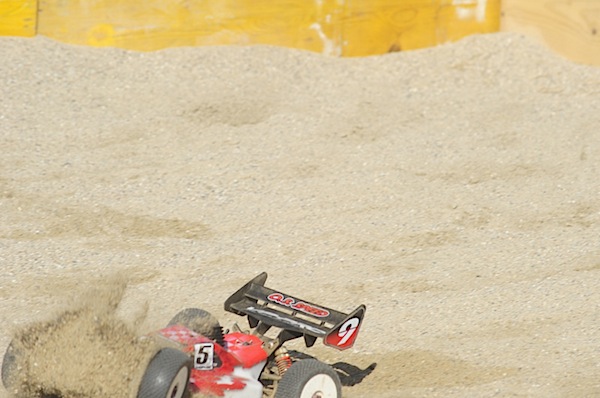
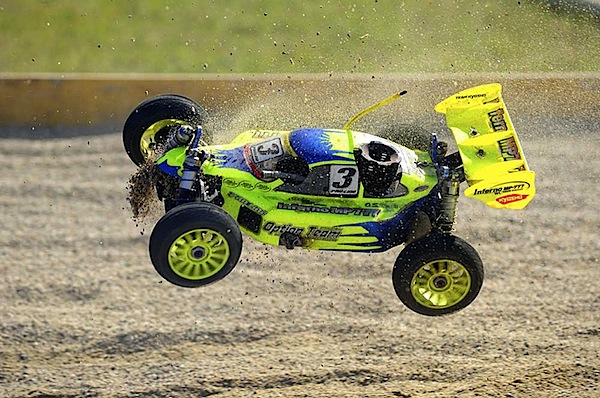
When you’re photographing a fast-moving subject, your AF will have its work cut out to keep up with the changing distances. Most times it fails. At this jump, in a radio-controlled buggy competition, I first started shooting in burst mode, with the AF switched on. This was the sort of thing I kept getting.


It wasn’t until I switched the AF (and burst mode) off and pre-focused on a spot where most of the buggies landed that I started to get decent shots.

7. Shooting through glass
Taking photographs through glass is generally not a good idea. Avoid it if you can. But sometimes it’s unavoidable, e.g. if you’re in a plane, or photographing fish in an aquarium. The trouble is, the AF may home in on reflections, or marks on the glass. So switch it off.
8. With portraits
The golden rule of portraiture is to focus on your subject’s eyes. What’s more, you often use a wide aperture to throw the background out of focus. But if your autofocus picks up your subject’s eyebrows or the tip of the nose then, because you’ve got such a narrow depth of field, the eyes will be blurred.
9. Macro
With macro photography autofocus has a hard time. The depth of field is so tiny that the camera has no idea what you want to focus on and the lens is likely to hunt wildly. You definitely must take control.
10. Composition with the ‘Rule of Thirds’
Many cameras have the autofocus spot fixed in the middle of the viewfinder. This means that if you’re composing with your subject at one of the classical ‘thirds’ positions it is likely to be out of focus.

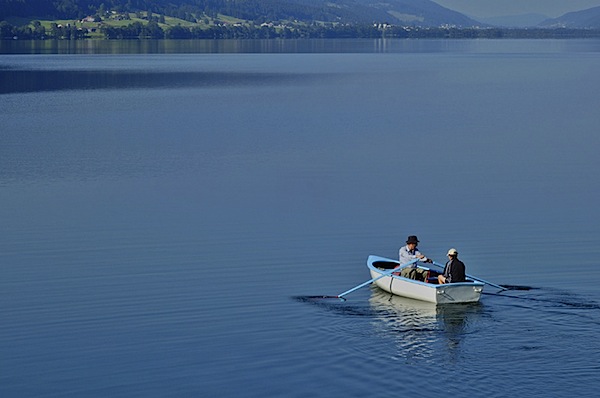
In this image a centralised autofocus would not pick up the boat and, on top of that, it would have difficulty latching to the smooth water of the lake.
So … autofocus is brilliant but it’s not infallible. A good photographer knows when to take control of the camera to get great shots in challenging situations
Alistair Scott is an award-winning freelance photographer and writer who has travelled the world widely. He lived for 20 years in Africa, but is now based in Switzerland. His latest book is ‘The LowDown Guide to Family Photography’, which can be seen at www.alscotts.com/fampage
Thursday, 17 December 2009
Why Don't I Look Good In Pictures?
I've been taking professional photographs for about thirty years. Ever since I started, I've heard a constant comment. It is always said something like "I just don't take good pictures" or "the camera just doesn't like me." Almost invariably, when this statement is uttered, everyone within earshot gives a chuckle, or immediately starts assuring the speaker that they really do look good. Sometimes it's true, but often it's not...
Some people do not photograph well – it's that simple.
To the best of my knowledge, nobody has ever been able to compose a list of physical features that cause someone to photograph well, or photograph poorly. Game show guru Monty Hall believed that the secret was in the size of the head. He insisted that all of the hosts of his shows had large heads. Obviously, this worked for him – his unmatched success attests to that.
Hollywood stars and starlets are very persnickety about how they are photographed. There are extreme cases, such as actor Alan Ladd. Mr. Ladd was quite short, and insisted that trenches be dug throughout the sets to make him always appear taller. When a trench wouldn't do, he had stools. Barbra Streisand goes to great lengths to ensure that only one of her profiles is photographed. Note that she will always have her escort on her right arm – to cause photographers to shoot her from the left side – her best side, according to the singing actress.
If you've looked at enough photographs, and seen enough TV and movies, you've been struck by one or two anomalies. Someone who is frightfully unattractive looks great in a photograph, or, someone who is stunningly attractive looks horrible. What causes this? Is the photographer lacking skill? Bad lighting, perhaps? Did the subject have a bad day? Of course these things could be true, but there's actually a very real, constant explanation for this phenomenon: dimensions.
We humans live in a world of three dimensions: front/back • left/right • up/down. Since we have stereo vision, we can see all three of these dimensions. Using geometry, we can see how the dimensions are arrived at. A straight line is one dimension: front back. To create the second dimension, make a line at a right angle to the first line, and do so until you have a square. This is two dimensional. Now, make squares at right angles to the first square until you have a cube – that's three dimensional. Voila!
We suspicion that there are more dimensions. Using the first three dimensions as the guide, if you took a cube and made cubes at right angles to it, ultimately you'd have a 4-D cube – sometimes called a hypercube, or "tesseract." The problem is, we can't even imagine a tesseract, much less make one. It's all theoretical. Some things in geometry are hard to grasp, but a tesseract is impossible to grasp.
One of the problems we have in understanding geometry is simply this: a two dimensional object, such as a square, has absolutely NO depth (thickness) at all. This means that it is completely invisible when looked at from the side view. But what's this all got to do with why you don't look good in photographs? Simple: people are three dimensional, and photographs are only two dimensional.
Anytime that you lose a dimension, your view is penalized, per se. If I take a head-on photograph of a cube, it appears as a square. I can do some 'tricks' to fool the viewer, such as make sure there is a shadow showing that the square is actually a cube, or taking the photo at an angle which shows at least one other side of the cube. But no matter what I do, the picture will always be a two dimensional view of a three dimensional object. Needless to say, there is a substantial difference between a square and a cube. And there is a substantial difference between seeing someone and seeing a picture of that same someone.
In people, all sorts of things affect how we perceive them. Many of these things are only present because of the third dimension. The distance between the ears and the tip of the nose, the depth of the eye sockets, the distance the nose and chin protrude from the face, and so on. None of these elements of a person's appearance are necessarily discernable in a photograph, and yet they are easily seen in person.
Some people are attractive because of the 3-D elements. Others do not depend on 3-D elements so much for their attractive appearance. And some people have such a string feature that is visible in 2-D, that any loss of 3-D is not very noticeable. Paul Newman, for example, was quite famous for his striking blue eyes. Blue is not dependant on dimension. Try to find a professional photograph of comedian/actor Jimmy Durante that did not emphasize his notoriously prominent proboscis. In a frontal view, he was just a mediocre looking fellow, but when his face was photographed to accentuate his large nose, he became quite unique.
If you or someone you know doesn't photograph well, take heart. You might try getting a digital camera and shooting picture after picture – each one showing just a modest shift of the angle of the head. Don't just change the angle side-to-side, but up and down as well. Looking slightly upward changes everything, as does looking slightly to one side. Do this in full, but not direct light – such as under your porch, or on a cloudy day. Don’t use the flash! If this doesn't achieve the desired result, try the same thing, but have a prominent light source. You can do this by pointing a light directly towards yourself, or by sitting in a darkened room, with only one light source in the room.
The techniques above will help to exaggerate the illusion of 3-D in the 2-D medium of the photograph. Do this enough, in enough positions and with enough lighting changes, and you just might be able to get back those good looks the camera's 2-D limitation has stolen from you. All the best!
www.edityourdigitalphotos.com
Saturday, 28 March 2009
Landscape Photography - Depth of Field
Depth of field is the limitation of perceived sharpness within a photographic image. The greater the depth of field, the more of the image from front to back that appears sharp. An image that is said to have a shallow depth of field has a short and more specific depth of sharpness.
In photography, careful use of depth of field can be a very powerful tool indeed. It can force viewers to focus only upon that which is sharp, by utilizing a shallow depth of field. As our eyes are not comfortable in viewing unclear images, we then tend to look at the parts of an image that is sharp, and our gaze will then focus upon that part of the image, rendering the other unsharp parts of the image as blurry and not worthy of our attention. This use of a shallow depth of field is particularly well suited to portraiture. As long as the eyes are sharp, most other things can be forgiven if they aren’t pin sharp. People and animals tend to look at the eyes first, and so the eyes really need to be sharp in nearly all portraiture photography.
Landscape photography is generally at the opposite end of the scale of depth of field, where the vast majority of landscape images require a very long depth of field. This is due to the fact that landscapes generally are trying emmulate an actual scene as we see it, and viewers are usually drawn into the image by its great depth of field.
Depth of field is controlled in two ways. The most commonly used is by aperture control. The smaller the aperture (the larger the number ie. F22), the greater the depth of field. The larger the aperture, (the smaller the number like F2.8), the shallower the depth of field. The apertures inbetween have a depth of field is that is directly proportionate to the aperture selected along the scale. The second means of controlling depth of field is by using a camera or lens that enables the lens to be tilted forward or back. This enables the focusing plane of the lens to be more inclined to the plane of focus of the subject matter, and hence providing a much better depth of field without a change of aperture. It is one of the major reasons for using bellows type cameras, or tilt lenses. With such a camera or lens, one can have a huge level of control over depth of field at any aperture.
Depth of field is also dictated by the focal length of the lens, and the camera format for which the lens is used. For instance, a wide angle lens always has a much greater depth of field than a telephoto lens. A very wide angled lens such as a 14mm lens has a depth of field so great that it almost doesn’t require focussing, wheras a 600mm telephoto lens has an extremely shallow depth of field, and unless focussed upon long distance subject matter, the depth of field will always be very limited indeed. On the other end of the scale are macro lenses, which are made to be able to focus very closely to objects. Once you start moving in and start focussing very closely, the depth of field again becomes extremely shallow indeed. The closer you get to the subject, the less the depth of field becomes, and in extreme close-ups just the slightest movement will cause the image to go out of focus entirely.
Geoff Ross
Sunday, 1 March 2009
Great Portraits in the Great Outdoors
If you have ever photographed your weekend outing, family reunion, or a special vacation getaway with your friends or family, you know that outdoor photography can present some very special challenges. This is true even for the most seasoned photographer. Direct sunlight can be harsh. Unwanted objects can interfere with your composition. Proper color rendering can be problematic. And many times, good old Mother Nature is just not feeling cooperative.
Perhaps, there’s not much that can be done about Mother Nature, but with some practice and patience you can overcome many of the other challenges you face as an outdoor portrait photographer. Along my journey as a photographer I’ve learned some outdoor techniques that may benefit those who choose to follow:
1. Keep it simple.
The subtle pattern and color of an adobe wall, the simple repeating pattern and muted tones of planks on a fishing pier, or the uniform color of a patch of blue bonnets, snapdragons, or yellow primrose can serve as wonderful backdrops for your outdoor portraits.
When you are composing your portrait, you want your subject to be the focal point that all eyes are drawn to. Busy patterns, large areas of excessively vibrant colors (especially a mixture of different colors), or over imposing forms in your foreground or background that are not treated properly, can really distract from her if you are not careful.
2. Control the depth of field (the range of distances from your camera that are in focus).
The edge of a forest, or mountains in the distance may render beautifully as a backdrop for your subject with proper control over the depth of field. If you have an SLR camera, you can adjust your depth of field to bring the background more or less out of focus relative to your subject.
This serves as eye control for the observer of your portrait. The eye is naturally drawn to what is brightest and most sharply focused. If your subject is sharply focused relative to the background, she will be accentuated as the focal point of your portrait.
Controlling the depth of field is accomplished by adjusting your aperture setting (the size of your lens opening, expressed in f-stops). The smaller the f-stop the larger the opening of your lens, and the smaller the depth of field will be. For instance, when you see a photograph in a nature magazine of a beautiful butterfly in a patch of flowers, and the butterfly is in razor sharp focus but the flowers are gently blurred; this was accomplished by the photographer using a narrow depth of field (small f-stop setting). For bright light situations this may be difficult to achieve.
For any given intensity of light, as you open up the aperture (lower the f-stop) you must increase the shutter speed (thereby decreasing exposure time) to avoid over exposure. Increasing the shutter speed generally reduces resolution in the image. Experiment to find the combination of aperture setting and shutter speed that gives the result you desire.
3. Be mindful of distracting objects behind your subject.
What is plainly a bush, a mailbox, or a birdhouse to your eye, can appear like an extra appendage growing out of the top of your subject’s head in your two dimensional portrait. You may get some interesting effects this way, but generally they will not make a good impression on your subject. Take the time to find an interesting angle that eliminates distracting objects from the background.
4. Control the light.
“Down light” (e.g. harsh midday light) is generally undesirable. Due to the shadow patterns it creates, it can bring out the worst in your subject … can anyone say, “Raccoon eyes”?
“Lateral light” (e.g. early morning and late afternoon light) is much more desirable. Lateral light can be controlled and directed to create beautiful shadow patterns across the face of your subject. There is a saying with many photographers who shoot outdoors, “the first tree in the forest is best” for a background. The reason is, the canopy of the first tree controls the harsh down light, but being on the edge of the forest, you still have lateral light to work with. The same idea holds true for porches or the edge of any other type of overhang. Professional photographers sometimes use shade cloth and reflectors to block down light while directing available lateral light to enhance their subject and achieve their desired effect.
5. Correct the color.
Before the digital age, corrective filters or special films were mostly used for color correction in outdoor portraits. With digital cameras, the color can be corrected using your white balance setting (expressed as color temperature in degrees Kelvin). Most digital cameras today do a pretty good job of automatically adjusting the white balance for outdoor exposures. If you would like to experiment with your manual white balance setting use the table below as a guide. For a more detailed understanding of the meaning of color temperature correction, see the article at: http://www.sizes.com/units/color_temperature.htm
Temperature Typical Sources
1000K....... Candles; oil lamps
2400K....... Early morning sunrise
3200K....... Tungsten light bulbs
4000K....... Fluorescent
5200K....... Typical daylight; electronic flash
6000K....... Cloudy Day
7000K....... Shade
Keeping your composition simple, controlling the depth of field, and eliminating objects that may distract from your subject, all help to accentuate your subject as the focal point of your portrait.
Controlling the available natural light and correcting the white balance of your photographs can reveal and enhance the true beauty of your subject. Beyond this, make it your aim each day to unleash your creativity that you may see the world around you in fresh and unique ways. Never be content with seeing the ordinary as ordinary. Just stop and think for a moment, everything there is, is ordinary to someone.
Art is created by those with the ability to see beyond the ordinary, to interpret their world in an exceptional way, and to reflect their interpretation for others to see. So, experiment and don’t be afraid to try something new. The world is abundant in forms, textures, colors, and patterns of light ... all the handy-work of God. Grand landscapes and magnificent manmade structures are not required for great photos in the great outdoors. May Mother Nature always cooperate with you. Good day and happy clicking!
"Finally... Learn How To Work That Darn Digital Camera Like A Pro"