Stock Photos
Showing posts with label wildlife photography. Show all posts

Thursday, 24 December 2009

10 Reasons to Turn off Your Autofocus

A Guest Post by Alistair Scott.

When I started using a camera autofocus was something out of science fiction. I mean … it would never work in real life, would it? Apart from anything else, how could it know what you wanted to focus on?
turn-off-auto-focus-01.jpg

Now fiction has become fact, and pretty well every camera has AF as standard. It works, and works well. But it doesn’t always work perfectly. It can pick up the wrong thing or fail to find anything to focus on, causing the lens to ‘hunt’ back and forth. Sometimes it won’t even let you fire the shutter.

So, here are ten situations when it’s worth turning your autofocus off and going back to the ‘good old days’ of manual focusing:

1. When there’s not enough light

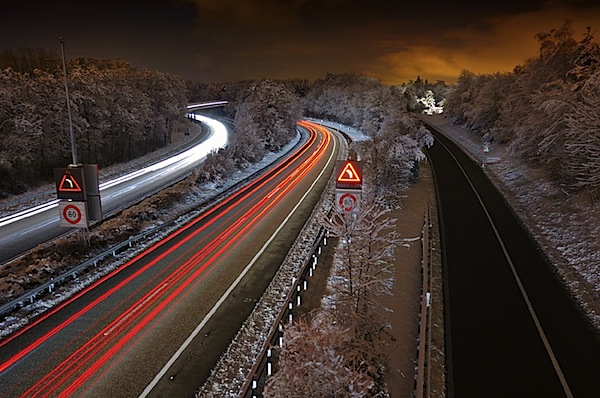
In low light, contrast is also low, and AF relies on light and contrast to latch on to things. Your camera may have an AF assist lamp built in. But, even if you have it switched on, it won’t work in situations like in the shot above.

Though the image looks bright enough, in reality there was little light, and it required a 30-second exposure.

2. When there’s not enough contrast

If your AF metering spot is on something like a plain-coloured wall the camera will find it impossible to focus, no matter how bright the light, and the lens will ‘hunt’. You can re-frame your shot temporarily so the spot is on something with detail and press the shutter half down to activate the AF. Then keep the shutter button half-pressed to lock the focus, and go back to your original composition. Or focus by hand.

3. Shooting wildlife

Most wild animals have excellent hearing and, no matter how good your autofocus, it will make a noise. Even the slightest whirr is likely to spook wildlife. Switch it off if you want those great, natural wildlife shots.

4. With landscapes

When shooting landscapes you usually want things in focus from the foreground to distant mountains. This means closing down the aperture to increase depth of field and focusing about a third of the way into the scene (at a point called the ‘hyperfocal distance’ where everything from quite close to infinity is sharp). Switch off the AF. If you leave it on, when you press the shutter it will re-focus … probably on those far-off mountains.

5. If you’re doing HDR

High Dynamic Range photography involves taking several shots of the same scene, all exactly the same except for exposure, then blending them when you’re back at the computer. It’s important to have identical focus in each shot to ensure success. With AF on, it may choose a slightly different focus point for each shot.

6. Fast action

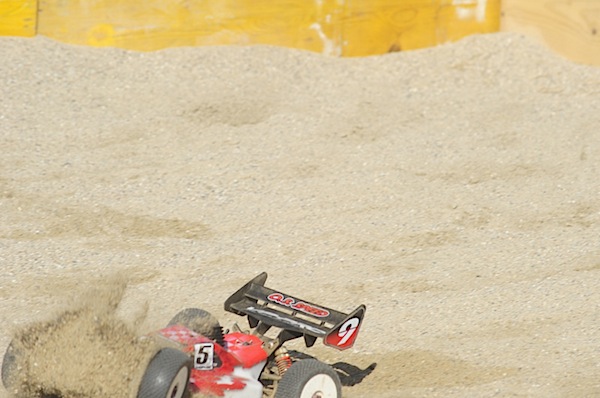
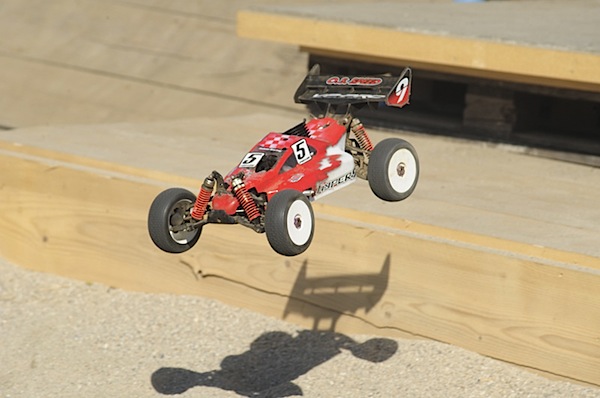
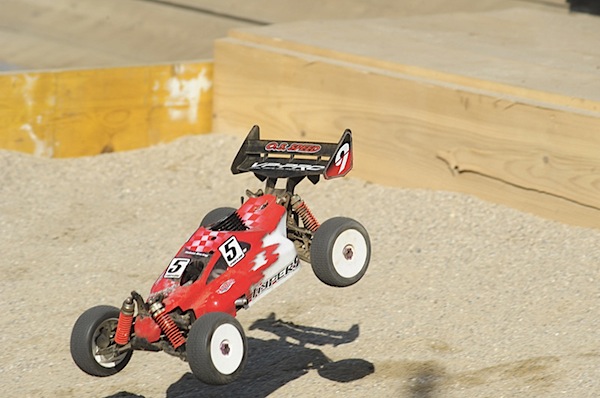
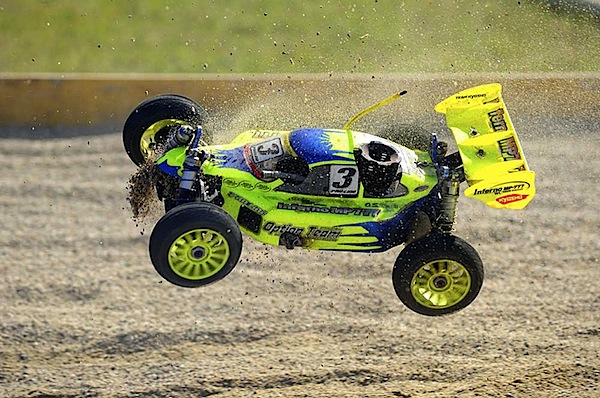
When you’re photographing a fast-moving subject, your AF will have its work cut out to keep up with the changing distances. Most times it fails. At this jump, in a radio-controlled buggy competition, I first started shooting in burst mode, with the AF switched on. This was the sort of thing I kept getting.
turn-off-auto-focus-02.jpg

turn-off-auto-focus-03.jpg

turn-off-auto-focus-04.jpg

It wasn’t until I switched the AF (and burst mode) off and pre-focused on a spot where most of the buggies landed that I started to get decent shots.
turn-off-auto-focus-05.jpg

7. Shooting through glass

Taking photographs through glass is generally not a good idea. Avoid it if you can. But sometimes it’s unavoidable, e.g. if you’re in a plane, or photographing fish in an aquarium. The trouble is, the AF may home in on reflections, or marks on the glass. So switch it off.

8. With portraits

The golden rule of portraiture is to focus on your subject’s eyes. What’s more, you often use a wide aperture to throw the background out of focus. But if your autofocus picks up your subject’s eyebrows or the tip of the nose then, because you’ve got such a narrow depth of field, the eyes will be blurred.

9. Macro

With macro photography autofocus has a hard time. The depth of field is so tiny that the camera has no idea what you want to focus on and the lens is likely to hunt wildly. You definitely must take control.

10. Composition with the ‘Rule of Thirds’

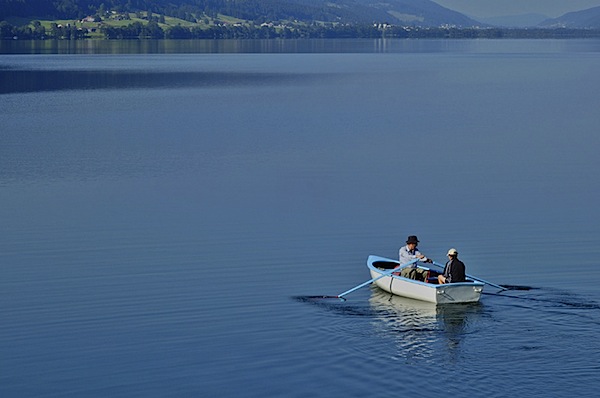
Many cameras have the autofocus spot fixed in the middle of the viewfinder. This means that if you’re composing with your subject at one of the classical ‘thirds’ positions it is likely to be out of focus.
turn-off-auto-focus-06.jpg

In this image a centralised autofocus would not pick up the boat and, on top of that, it would have difficulty latching to the smooth water of the lake.

So … autofocus is brilliant but it’s not infallible. A good photographer knows when to take control of the camera to get great shots in challenging situations

Alistair Scott is an award-winning freelance photographer and writer who has travelled the world widely. He lived for 20 years in Africa, but is now based in Switzerland. His latest book is ‘The LowDown Guide to Family Photography’, which can be seen at www.alscotts.com/fampage

Saturday, 28 March 2009

Landscape Photography - Depth of Field

Landscape photography is generally at the opposite end of the scale of depth of field, where the vast majority of landscape images require a very long depth of field. This is due to the fact that landscapes generally are trying emmulate an actual scene as we see it, and viewers are usually drawn into the image by its great depth of field.


Depth of field is the limitation of perceived sharpness within a photographic image. The greater the depth of field, the more of the image from front to back that appears sharp. An image that is said to have a shallow depth of field has a short and more specific depth of sharpness.

In photography, careful use of depth of field can be a very powerful tool indeed. It can force viewers to focus only upon that which is sharp, by utilizing a shallow depth of field. As our eyes are not comfortable in viewing unclear images, we then tend to look at the parts of an image that is sharp, and our gaze will then focus upon that part of the image, rendering the other unsharp parts of the image as blurry and not worthy of our attention. This use of a shallow depth of field is particularly well suited to portraiture. As long as the eyes are sharp, most other things can be forgiven if they aren’t pin sharp. People and animals tend to look at the eyes first, and so the eyes really need to be sharp in nearly all portraiture photography.

Landscape photography is generally at the opposite end of the scale of depth of field, where the vast majority of landscape images require a very long depth of field. This is due to the fact that landscapes generally are trying emmulate an actual scene as we see it, and viewers are usually drawn into the image by its great depth of field.


Depth of field
is controlled in two ways. The most commonly used is by aperture control. The smaller the aperture (the larger the number ie. F22), the greater the depth of field. The larger the aperture, (the smaller the number like F2.8), the shallower the depth of field. The apertures inbetween have a depth of field is that is directly proportionate to the aperture selected along the scale. The second means of controlling depth of field is by using a camera or lens that enables the lens to be tilted forward or back. This enables the focusing plane of the lens to be more inclined to the plane of focus of the subject matter, and hence providing a much better depth of field without a change of aperture. It is one of the major reasons for using bellows type cameras, or tilt lenses. With such a camera or lens, one can have a huge level of control over depth of field at any aperture.


Depth of field is also dictated by the focal length of the lens, and the camera format for which the lens is used. For instance, a wide angle lens always has a much greater depth of field than a telephoto lens. A very wide angled lens such as a 14mm lens has a depth of field so great that it almost doesn’t require focussing, wheras a 600mm telephoto lens has an extremely shallow depth of field, and unless focussed upon long distance subject matter, the depth of field will always be very limited indeed. On the other end of the scale are macro lenses, which are made to be able to focus very closely to objects. Once you start moving in and start focussing very closely, the depth of field again becomes extremely shallow indeed. The closer you get to the subject, the less the depth of field becomes, and in extreme close-ups just the slightest movement will cause the image to go out of focus entirely.

Geoff Ross


Sunday, 22 February 2009

Bird Photography - How to 'Catch' Them

Birds have been one of the greatest subject for photographers for centuries now because they have an inspiring beauty and mystify us with their gift of flight and diversity.

When it comes to photographing birds and their behavior, catching it on 'film' will add a tremendous visual impact and feeling to any picture. There are different locations where birds gather, but really the best place you may what to start is your backyard. The thing about birds is that they are busy little bodies and a bird feeder in the backyard is a great place to get a picture when they are feeding or even the bird in the air getting ready to pounce one of the birds that is currently feeding.

When you venture out of your backyard to look for birds to photograph your vehicle may just become your newest piece of equipment. Birds see our cars less of a threat then a person carrying a long lens underneath their arm. A vehicle makes for a great blind and along with this patience is a virtue. When you find a location such as a prime feeding ground, park a bit of a ways from it and stop your engine to cut down on noise that may scare them.

Standard,wide-angle and short zoom lenses can be used for photographing birds, but for serious bird photography, a quality 500 mm or 600 mm telephoto lens is ideal.

Please keep in mind to avoid any situation that can put stress on the birds and their surroundings. If you notice a bird that is starting to show any kind of stress, this means that there is a nest or chicks near by. Any further picture taking should be disengaged and you should leave the immediate area. As a photographer of birds or any wildlife, it is a good thing to remember not to put ourselves or the birds around us in any kind of danger.

Here are some good books on the subject:


Sterling Publishing Book: Bird Photography


The Art of Bird Photography II by Arthur Morris

Digital Nature Photography: The Art and the Science

The BetterPhoto Guide to Digital Nature Photography (BetterPhoto Series)

And some equipment:

NatureScapes Skimmer Ground Pod II, for Ground Level Bird & Wildlife Photography


The Skimmer is the ultimate support for ground-level bird and wildlife photography. Made with super heavy duty reinforced crush-proof injection molded plastic it isrugged yet lightweight, weighing less than 15oz. With a unique circular design, it allows you to slide camera equipment in any direction on the ground, even through mud, sand, and grass. And your equipment stays clean and dry, even in upto an inch and a half of water! Approximately 10" in diameter and 1.5" high, the Skimmer's flat bottom allows itto slide and pan easily along the beach or mud without scooping up earth, protecting equipment from grit and moisture. The sides are turned out slightly to push sand and mud out and away, helping to keep debris from coming over the top. A protected area inside the plate can even be used to store teleconverters, extension tubes, and other incidentals for quick access while shooting. The Skimmer was designed by photographers for photographers to meet their rigorous demands in the field.


Canon Telephoto EF 500mm f/4.0L IS (Image Stabilizer) USM Autofocus Lens


Canon Telephoto EF 600mm f/4.0L IS Image Stabilizer USM Autofocus Lens


Canon Telephoto EF 600mm f/4.0L IS Image Stabilizer USM Autofocus Lens